Tuesday, January 5, 2021

Index to All Posts

This page is created to serve as an index to all the blog posts. Please let us know if any of the entries does not quite fit in the category.  Most, if not all, the recipes are also posted on https://www.facebook.com/yumyumpapa2 with a bit more context and history for each dish.  An asterisk at the end of an entry indicates the possibility of a one-pot meal.

#Non-Chinese&Non-Regional-Chinese_Dishes (非中式主菜 和不屬於仼一菜系的中餐)
  1. Beer Braised Duck (啤酒鴨)
  2. Fried Crispy Duck (香酥鸭)
  3. Some Eggplant Dishes (I 九層塔茄子)
  4. Smoked Chicken and Smoked Pork Ribs (燻雞、燻小排)
  5. Holiday Main Dishes- Kalua Pork and Stuffed Pork Loin Roll (夏威夷烤豬肉, 厘肌肉卷)
  6. Cioppino- San Francisco-Style Seafood Stew (義式燉海鮮)
  7. Jambalaya and Shrimp Gumbo (美國南方 蝦仁燴飯, 蝦仁濃湯)*
  8. Galbi Jjim, Korean-style Braised Beef Short Ribs (韓式牛小排)
  9. Spanish Rice, Arroz con Pol(lo (Rice and Chicken), and Rice Pilaf*
  10. Skillet Chicken Pot Pie*
  11. Some Air Fryer Recipes (Pita Chips, Potato Wedges, Crispy Chicken, Crispy Duck)
#Soup_Casserole (湯湯水水)
  1. Pumpkin Soup (南瓜濃湯)
  2. Chinese Style Russian Soup (羅宋湯)
  3. Cabbage Soup (aka Vegetarian Russian Soup, 素羅宋湯)
  4. Napa Cabbage Gratin (烤白菜)
  5. Two Taiwanese-style Thickened Soups (西魯肉, 赤肉羹)
  6. Tomato and Eggs Soup (番茄蛋花湯)
  7. Winter Melon Soup (火腿冬瓜湯)
  8. Daikon and Pork Rib Soup (白蘿蔔排骨汤)
  9. Hot and Sour Soup (酸辣湯) 
  10. Traditional Shanghai Soup with Fresh and Salted Pork (醃篤鮮)
  11. Soup with Ham and Bean Curd Strips (火腿乾絲湯) 
  12. Bean Vermicelli Soup with Fried Bean Curd Puff (油豆腐細粉)
  13. Shanghai-style Thick Soup with Minced Fish Filet (III.薺菜魚羹)
  14. Cantonese-style Congee (廣東粥- 皮蛋瘦肉粥、生滾魚片粥)*
  15. Taiwan-style Tempura Soup (I.台式關東煮)
  16. Mushroom Chicken Soup (II.香菇雞湯)
  17. Shrimp Gumbo (美國南方 蝦仁濃湯)*
  18. Olive Garden's Zuppa Toscana, a creamy Tuscan Soup (義大利濃湯)
  19. Galbi Jjim, Korean-style Braised Beef Short Ribs (韓式牛小排)
#Snacks_Appetizers_Salad (零食, 小吃, 開胃菜, 沙拉)
  1. Big Chicken Cutlet (大雞排) 
  2. Turtle-shaped Red Rice Cake (紅龜粿)
  3. Mugwort Rice Cake (艾草粿)
  4. Cantonese Steamed Sponge Cake (馬拉糕)
  5. Celery and Jelly Fish (西芹海蜇)
  6. Mung Bean Jelly (綠豆涼粉)
  7. Puff Pastry Magic- Palmier, Chinese Shao Bing, and Portuguese Egg Tarts (起酥皮做的 蝴蝶酥, 甜燒餅, 葡式蛋塔)
  8. Seaweed Almond Crisps (海苔杏仁酥/海苔薄燒)
  9. Sweet Almond Cream  (杏仁露)
  10. Lamplight Beef (燈影牛肉)
  11. Sweet-and-sour Shredded Daikon (糖醋蘿蔔絲)
  12. Stewed Bean Curd Chunks (王媽媽滷豆乾)
  13. Japchae -- Korean Sweet Potato Noodle Dish (韓國粉絲)
  14. Chinese-style Pork Jerky and Beef Jerky (豬肉乾, 牛肉乾)
  15. Sesame Seeds Candy and Chinese Nougat (芝蔴糖, 牛軋糖)
  16. Date Paste and Walnut Candy (棗泥核桃糕, aka 南棗核桃糕)
  17. Roasted Soybeans (筍豆)
  18. Mung Bean Cake (綠豆糕)  
  19. Taiwan-style Chicken Wrap (台式雞卷) 
  20. Two More Taiwan-Style Snacks (台灣小吃 龍鳳腿, 台南蝦卷) 
  21. Taiwan-style Bowl Rice Cake ( 台灣小吃 碗粿) 
  22. Steamed Rising Cake (Fa-Gao, 發糕)
  23. Hong-Kong-style Turnip Cake (港式蘿蔔糕)
  24. Cantonese White Sugar Cake (白糖糕)
  25. Taiwan-style Popcorn Chicken (台灣小吃 鹽酥雞)
  26. Salt-and-Pepper Chicken Wings (廣式 椒鹽雞翼) 
  27. Shanghai-style Smoked Fish (燻魚)
  28. Ma-Lan Veggie with Minced Bean Curds  (香乾馬蘭頭) 
  29. Bean Sprouts with Three Shreds (銀芽三絲)
  30. Wheat Gluten with Four Ingredients (四喜烤麩)
  31. Pan-fried or Roasted Peanuts  (油炸花生, 烤花生)
  32. Peanuts with Dried Anchovy and Indonesian-style Peanuts with Silver Fish (花生小魚乾)
  33. Smashed Cucumber Salad (涼拌黃瓜)
  34. Cabbage Salad & Lotus Roots Salad (涼拌包心菜, 涼拌蓮藕) 
  35. Kale Salad (羽衣甘藍沙拉)
  36. Tabbouleh, Baba Ganoush, and Hummus (三樣地中海開胃菜)
  37. Moussaka from Lebanon (地中海茄子)
  38. Taiwanese-style Sweet-and-Sour Cabbage & Korean-style Chive Salad (台式泡菜, 韓式涼拌韭菜)
  39. Guacamole and Quesadilla 
#SeaFood (魚蝦海鮮)
  1. Shanghai Sauteed Shrimp (上海油爆蝦)
  2. Fish Gluten (魚麵筋)
  3. Microwave Steam Fish (簡速清蒸活魚)
  4. Spicy fish fillet and tofu (豆瓣魚片)
  5. Shanghai-style Smoked Fish (燻魚)
  6. Sautéd Crystal Shrimp (水晶蝦仁)
  7. Fried Eggplant Stuffed with Shrimp (II.酥炸茄盒) 
  8. Taiwan-Style Shrimp Roll (台南蝦卷) 
  9. Clams with Basil (九層塔炒蜆)
  10. A Dish or Two with Fish Steak (清蒸鱈魚 or 豆酥鱈魚)
  11. Dishes with Fish Filet (糟溜魚片, 糖醋魚片, 薺菜魚羹)
  12. Szechwan Boiled Fillet of Fish (四川水煮魚)
  13. Noodle with Fish Filet and Pickled Mustard Greens (I.雪菜魚煨麵)*
  14. Taiwan-style Tempura Soup (I.台式關東煮)
  15. Cioppino- San Francisco-Style Seafood Stew (義式燉海鮮)*
  16. Jambalaya and Shrimp Gumbo (美國南方 蝦仁燴飯, 蝦仁濃湯)*
  17. Shrimp Fried Rice (蝦仁蛋炒飯)
#ShanghaiDish (上海菜, 含江浙菜、淮揚菜)
  1. Spring Rolls (春卷)
  2. The Perfect Ten Vegetables (十全十美 素十錦)
  3. Sticky Rice Cake with Mustard Greens (雪菜炒年糕, 薺菜炒年糕)*
  4. Two Veggie Dishes with Pickled Mustard Greens (雪菜百葉毛豆,雪菜蠶豆酥)
  5. Shanghai Sauteed Shrimp (上海油爆蝦)
  6. Wine-Soaked Chicken (醉雞)
  7. Air-Dried Chicken (風雞)
  8. Sautéd Crystal Shrimp (水晶蝦仁)
  9. Fish Gluten (魚麵筋)
  10. Shanghai-style Smoked Fish (燻魚)
  11. Shanghai-style Rolls wrapped in Soy Sheet (薺菜百頁包)  
  12. Traditional Shanghai Soup with Fresh and Salted Pork (醃篤鮮)
  13. Bean Vermicelli Soup with Fried Bean Curd Puff (油豆腐細粉)
  14. Soup with Ham and Bean Curd Strips (揚州煮乾絲 or 火腿乾絲湯) 
  15. Wheat Gluten with Four Ingredients (四喜烤麩)  
  16. Ma-Lan Veggie with Minced Bean Curds  (香乾馬蘭頭)  
  17. Wu-Xi Style Pork Loin Back Rib (無錫排骨)
  18. Shanghai-style Pork Hock (冰糖元蹄 or 走油蹄膀)
  19. Dong-Po Pork (東坡肉)
  20. Pearl Balls & Braised Lion Head (珍珠丸子, 紅燒獅子頭)
  21. Spicy Pickled Long Beans (辣炒酸豇豆)
  22. A Dish or Two with Fish Steak (II.豆酥鱈魚)
  23. Shanghai-style Fish Filet (II.糖醋魚片)
  24. Shanghai-style Thick Soup with Minced Fish Filet (III.薺菜魚羹)
  25. Noodle with Fish Filet and Pickled Mustard Greens (I.雪菜魚煨麵)*
  26. Shanghai-style Vegetable Rice (上海菜飯)*
  27. Granny's Cured Pork (婆婆從前這樣做臘肉, in Chinese)
  28. Roasted Soy Beans (筍豆)
  29. Traditional Sweet and Sour Sauce (甜酸醬 or 糖醋調味料)
  30. Homemade Tahini and Chinese-style Sesame Paste (V. 芝蔴醬)
#TaiwanDish (台菜, 含客家菜)
  1. Turtle-shaped Red Rice Cake (紅龜粿)
  2. Mugwort Rice Cake (艾草粿)
  3. Stir Fry Rice Noodle (肉絲炒米粉)*
  4. A Very Special Taiwan-style Stir-Fried Rice (台灣油飯)*
  5. Taiwan-style Minced Pork Sauce and Rice Pasta (台式香菇肉燥, 肉燥米台目)*
  6. Two Taiwanese-style Thickened Soups (西魯肉, 赤肉羹)*
  7. Taiwan-style Chicken Wrap (台式雞卷) 
  8. Two More Taiwan-Style Snacks (台灣小吃 龍鳳腿, 台南蝦卷) 
  9. Taiwan-style Bowl Rice Cake ( 台灣小吃 碗粿) 
  10. Taiwan-style Popcorn Chicken (台灣小吃 鹽酥雞)
  11. Taiwan-style Pig Feet (台式滷豬腳, 豬腳麵線)*
  12. Taiwan-style Pork-Stew with Rice (台式滷肉飯)*
  13. Taiwanese-style Three-Cup Chicken (台式三杯雞)
  14. Taiwan-style Braised Chicken, aka Teriyaki Chicken (I.台式照燒雞)
  15. Taiwan-style Tempura Dishes (台式關東煮, 韭菜花炒甜不辣) 
  16. Pan-fried Rice wrapped in Egg Crepe (蛋包飯)*
  17. Bitter Melon With Eggs (II.苦瓜炒蛋)
  18. An apprentice's Basic Canape'(s)  (油炸花生,炒酸菜) 
  19. Taiwanese-style Sweet-and-Sour Cabbage (台式泡菜)
  20. Hakka Stir-Fry (客家小炒)
  21. Hakka Steam Pot (客家三封)*
  22. Sweet and Spicy Sauce (甜辣醬) 
#CantoneseDish (粵菜)
  1. Microwave Steam Fish (簡速清蒸活魚)
  2. BBQ Baby Back Rib (叉燒醬烤排骨)
  3. Cantonese-style Steamed Pork Short Ribs (豉汁蒸排骨)
  4. Cantonese-style BBQ Pork (廣式叉燒)  
  5. Cantonese-style pan-fried noodle (叉燒兩面黃)*
  6. Braised Longevity Noodle (干燒伊麵)*
  7. Cantonese Yang Zhou Fried Rice (揚州炒飯)*
  8. Singapore-style Rice Noodle (星州炒米粉)*
  9. Clay-pot baked rice with Chinese sausages and ham (臘味堡仔飯)*
  10. Cantonese-style Congee (廣東粥- 皮蛋瘦肉粥、生滾魚片粥)*
  11. Hong-Kong-style Turnip Cake (港式蘿蔔糕)
  12. Two Popular Snacks (廣式 椒鹽雞翼) 
  13. Cantonese-style Chicken in Seafood Soy Sauce (II.廣式鼓油雞)
  14. Hainanese Chicken Rice (海南雞飯)
  15. Diced Chicken Wrapped in Lotus Leaf (荷葉糯米雞)
  16. Clams with Basil (九層塔炒蜆)
  17. Cantonese-style Fish Filet (I.糟溜魚片)
  18. Beef Tendon and Drop Flank Stew (牛腩牛筋煲)*
  19. Sacha Beef (沙茶牛肉)
#SzechuanDish (川菜)
  1. Spicy fish fillet and tofu (豆瓣魚片)
  2. Ma-Po Tofu (麻婆豆腐)  
  3. A Famous Szechuan Dish (螞蟻上樹, Ground Pork and Bean Vermicelli) 
  4. Snowflake Chicken (雪花雞)
  5. Lamplight Beef (燈影牛肉)
  6. Spicy & Sour Cold Noodle (I.酸辣涼粉) 
  7. Some Eggplant Dishes (I.鱼香茄子) 
  8. Szechwan Diced Chicken (四川辣子雞)
  9. Szechwan Boiled Fillet of Fish (四川水煮魚, 水煮肉片, 水煮牛)
  10. Stir-fried Chinese Ham with Leeks (蒜苗臘肉)
  11. Hot Chili Pepper Oil (麻辣紅油)
#VegetarianDish (素菜)
  1. weet-and-sour Shredded Daikon (糖醋蘿蔔絲)
  2. Japchae -- Korean Sweet Potato Noodle Dish (韓國粉絲)
  3. The Perfect Ten Vegetables (十全十美 素十錦)
  4. Wheat Gluten with Four Ingredients (四喜烤麩)  
  5. Bean Sprouts with Three Shreds (銀芽三絲)
  6. Been Sprouts and Chive Stir-Fried with Bean Curd (綠豆芽炒豆腐乾)
  7. Thee More Bean Curd Dishes (韭黃香乾, 黃豆芽香乾, 辣炒香乾)
  8. Two Veggie Dishes with Pickled Mustard Greens (雪菜百葉毛豆,雪菜蠶豆酥)
  9. Some Simple Veggie Dishes (炒青菜, 炒三絲, 糖醋蓮花白) 
  10. Tomato and Eggs Stir-Fried (番茄炒蛋)
  11. Stewed Tofu with Tomatoes (蕃茄豆腐)
  12. Napa Cabbage with Bean Vermicelli (大白菜粉絲) 
  13. Spicy & Sour Cold Noodle (I.酸辣涼粉) 
  14. Cold Noodle in Sesame Paste (II.麻醬涼麵)*
  15. A Pumpkin Dish (燒南瓜) 
  16. Two Bitter Melon Dishes (苦瓜兩吃) 
  17. Some Eggplant Dishes (III.鍋塌茄子)
  18. A Treasure Trove of Vegetable Chunks (四寶粒)
  19. Cabbage Soup (aka Vegetarian Russian Soup, 素羅宋湯)
  20. Shanghai-style Vegetable Rice (上海菜飯)*
  21. Braised Longevity Noodle (干燒伊麵)*
  22. Smashed Cucumber Salad (涼拌黃瓜)
  23. Cabbage Salad & Lotus Roots Salad (涼拌包心菜, 涼拌蓮藕) 
  24. Kale Salad (羽衣甘藍沙拉)
  25. Tabbouleh, Baba Ganoush, and Hummus (三樣地中海開胃菜)
  26. Moussaka from Lebanon (地中海茄子)
#NorthernChinaDish (北方菜, 麵點)
  1. Beef Xian Bing (牛肉餡餅)*
  2. Chive Pocket (韮菜盒子) 
  3. Sesame Pancake (芝麻大餅)
  4. Sesame-Paste Biscuit (芝麻醬燒餅) 
  5. Scallion Pancake (蔥油餅)
  6. Water Dumplings with ground pork and Napa cabbage (白菜豬肉水餃)*
  7. Beef Noodle, Stewed Beef, and more (牛肉麵;  滷牛肉, 滷蛋;  滷菜)*
  8. Noodle in Ground-pork Bean Sauce (炸醬麵)*
  9. Cold Noodle in Sesame Paste (II.麻醬涼麵)*
  10. Noodle with Sliced Pork and Pickled Mustard Greens (II.雪菜肉絲麵)*
  11. Tien-Jin Moo-Shu Pork (天津木須肉)
  12. Sour Napa Cabbage with Bamboo Shoots and Pork (酸筍炒肉絲)
  13. Homemade Tahini and Chinese-style Sesame Paste (V. 芝蔴醬)
#Non_Western_Cake_Dessert_Bread (中式糕點, 甜食)
  1. Japanese Cheesecake (日式起司蛋糕)
  2. Mango Mousse Cake (芒果慕斯蛋糕)
  3. Egg Yolk Shortcake (蛋黃酥)
  4. Baked Sweet Rice Cake with Red bean paste (烤紅豆年糕)
  5. The Perfect Bread (湯種麵包)
  6. Mung Bean Cake (綠豆糕)  
  7. Steamed Rising Cake (Fa-Gao, 發糕)
  8. Cantonese White Sugar Cake (白糖糕)
  9. Hong-Kong-style Turnip Cake (港式蘿蔔糕)
  10. Sesame Seeds Candy and Chinese Nougat (芝蔴糖, 牛軋糖)
  11. Date Paste and Walnut Candy (棗泥核桃糕, aka 南棗核桃糕)
  12. Moon Cake with Date Paste Filling (廣式棗泥月餅)
  13. Mung Bean Soup with Chinese Pearl Barley (I.綠豆薏仁湯) 
  14. Sweet Almond Cream  (杏仁露)
#Western_Dessert_Bread_Quiche_Dip_Salad (西式糕點, 麵包, 蛋派)
  1. Italian Sponge Cake and Swiss Roll (歐式海綿蛋糕、蛋糕卷)
  2. Cranberry Biscuit
  3. Kahlua Cake
  4. Apple Pie
  5. Tiramisu
  6. Focaccia- Italian Flat Bread (義式薄麵包)
  7. Breakfast! Cornbread, Quiche Lorraine, and Scone (玉米麵包, 法式蛋派, 蘇格蘭鬆餅)
  8. Breakfast? Steakhouse Black Bread, Crustless Quiche, Pineapple Cake (黑麵包, 蛋派, 鳳梨糕)
(Updated- 12/10/2018.  Created- 11/30/2014.)

Monday, December 28, 2020

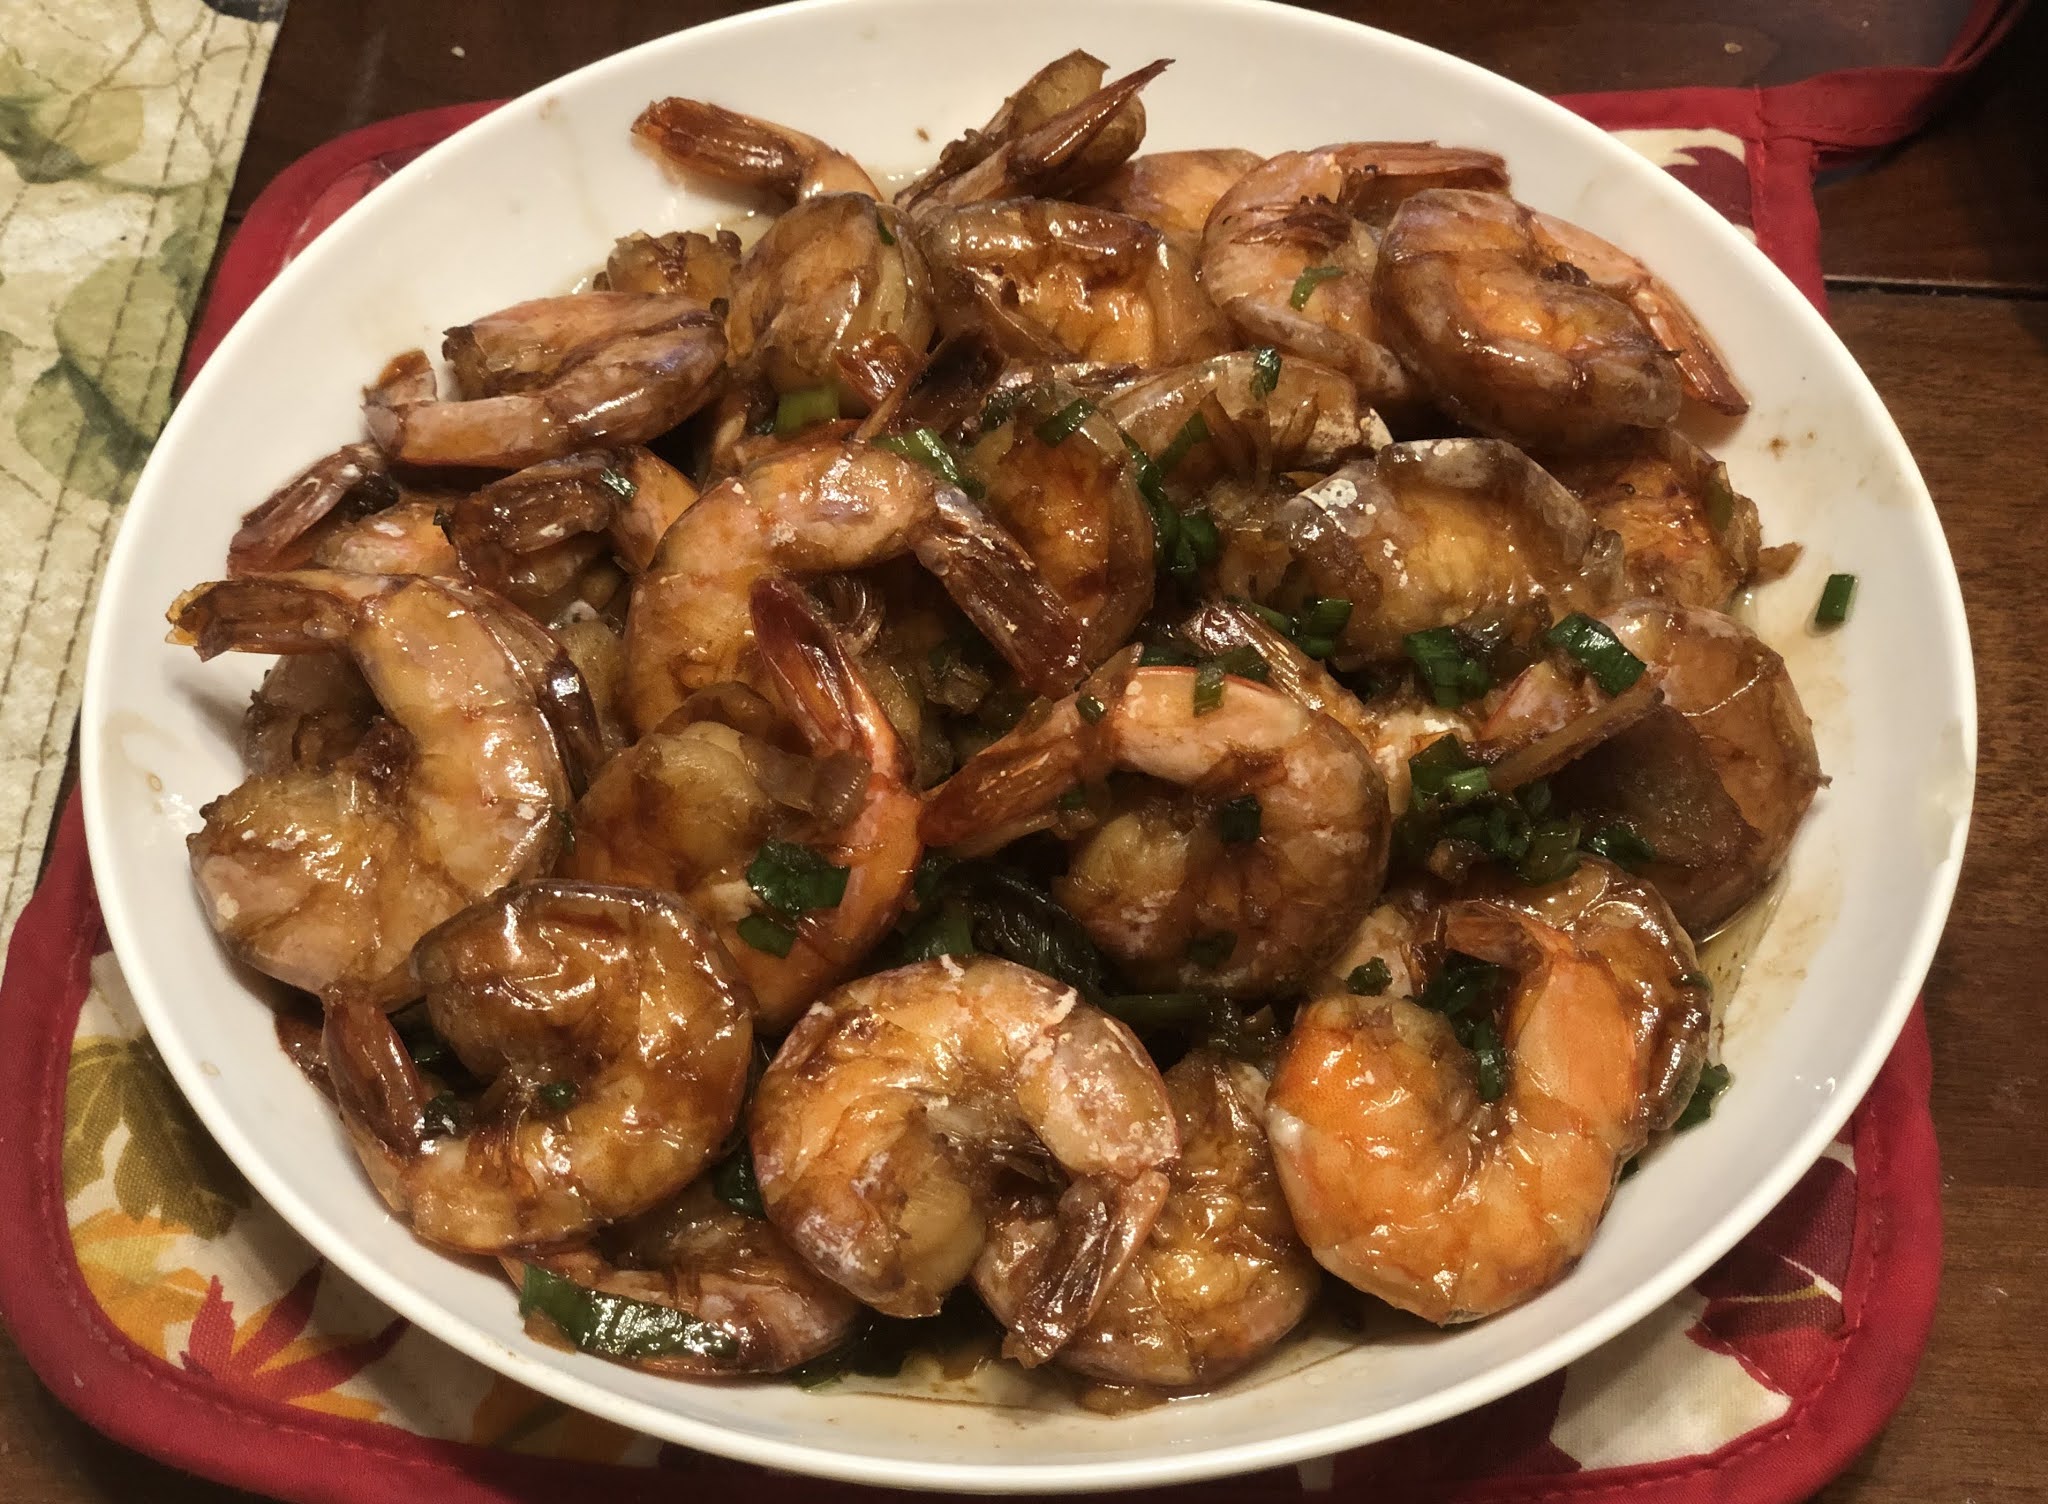
Shanghai Sauteed Shrimp (上海油爆蝦)


This is a traditional Shanghai dish, using shrimps with shells (of course, deveined).  It's very simple to prepare, yet, delicious and delightful for all occasions.  

Ingredients
  1. 1 lb mid-sized (31-40 per pound) shrimps with shells (deveined and uncooked, widely available in all regular markets, in frozen form, in 2-pound bags)
  2. Green onions, 1 stalk chopped into 1/2"-1" segments, and 1 stalk minced.
  3. Ginger 3-4 slices (no need to mince).
  4. Vegetable oil, 4 Tbsp (i.e., 1/4 cup) for initial saute'ing.
  5. Seasonings (marinating): rice cooking wine, 2-3 Tbsp; Baking Soda, 1/2 tsp.
  6. Seasonings (cooking): soy sauce, 2-3 Tbsp; sugar, 2-3 tsp; ShanoXing Wine (or, regular Rice Cooking wine), 3-4 Tbsp.
Methods
  1. Marinate the shrimps for 30-60 minutes (Ingredients 1 & 4). Note- defrost the shrimps, and drain fluid beforehand. Quick Defrosting- Immerse the frozen shrimps in room temperature water for 30 minutes, change water, wait another 30 minutes.
  2. Add 4 Tbsp of vegetable oil (i.e., 1/4 cup) into a flat bottom cooking pan, turn on high heat for 1-2 minutes.
  3. [High Heat] Drain fluid again from the marinated shrimps. Add the shrimps into the cooking pot, and stir quickly with a spatula for 10-15 seconds, add 3-4 Tbsp of ShaoXing Wine (or regular cooking wine), stir for 5 seconds, and cover the lid for 30--60 seconds.
  4. [Medium-High-Heat] Turn the heat down a bit, spread the shrimps to the side of the pot to create a center opening, then place the green onion segments and ginger slices to the center, add  soy sauce (2-3 Tbsp), and sugar, 2-3 tsp, to the center. Stir the center content for 10-15 seconds, and then, mix in all the shrimps from the side. 
  5. [High Heat] Turn up the heat, and stir the shrimps for a minute or two, till the shrimps are red, and shiny..
  6. Turn off heat, sprinkled minced green onions on top, and serve. The results from our kitchen is at the top of this post.

Sunday, December 27, 2020

Big Chicken Cutlet (大雞排)


This relatively big piece of chicken cutlet (大雞排) is popular in Taiwan's night markets. We learned and tried our hands on making it in our kitchen. The method seems relatively straightforward, and the results quite satisfactory.  

Ingredients

  1. Two boneless, skinless chicken breasts
  2. General purpose flour
  3. 2 eggs, whisk into egg fluid, use half first
  4. Bread crumbs (we used the type with Italian Seasonings from the markets)
  5. Vegetable Oil, 4 Tablespoons, i.e., 1/4 cup, to start, and add as needed, when the chicken cutlet has absorbed all the oil during the pan-frying
  6. Seasonings (marinade): soy sauce, sugar, 5-spices, green onions, ginger. 

Methods

  1. Butterfly-cut each chicken breast (no need to pound/hammer the meat); Note- Start with the method described in this bbc post, by cutting a 1/4" thin-slice from the right to the left (take care NOT to cut through). Open the newly sliced chicken to the left, and flip the now sliced-opened chicken breast, by lifting the left side up first and flipping to the right. Now the thin slice should be on your right side, and the thick side is on your left side. Now cut a 1/4" thin slice from the center, where the chicken breast starts to turn thick after the first cut, and move the knife to the left (take care NOT to cut through). Flip the newly cut slice to the left again, and, now the chicken breast is in the shape of a butterfly, with two 1/4"-thick wings open from the center. 
  2. Marinate the chicken breast for ~30 minutes, with soy sauce, sugar, 5-spices, 1 stalk of green onions (cut into 1/2 to 1-inch segments), and ginger slices. 
  3. Setup 3 flat plates- first plate with flour, second plate with egg fluid (1-egg's fluid first), 3rd plate with bread crumbs.
  4. [Prepare to Pan-fry the Chicken Cutlet] Add 4-table spoons of vegetable oil, turn on medium heat.
  5. Gently take out the now marinated chicken cutlet, dip both sides of the piece horizontally on the plate with flour, then, both sides on the plate with egg fluid, then, both sides on the plate with bread crumbs.
  6. Lastly, place it flatly into the frying pan. Pan-fry until both sides are golden brown. See the very tasty results from our kitchen at the top of this post (Note- the plate is 8.5" in diameter).


Sunday, December 29, 2019

Cantonese Steamed Sponge Cake (馬拉糕)


Cantonese Steamed Sponge Cake (馬拉糕, pronounced as Ma-La-Gau) is a dim-sum dessert. It's steamed, not baked, hence more moist than the usual sponge cakes. This was made at the beginning of 2019, when Papa's mom was still able to eat a cake like this. We largely followed what's in one of those out-of-print Wei-Chuan recipe books (味全食譜), with minor adjustments here and there.
  1. Line a 8”x8” glass baking pan with plastic wrap;
  2. Place 5 eggs and 1 cup brown sugar into a stand mixer, and beat to creamy color; 
  3. Melt 1/2 cup of butter or shortening in Microwave (30 seconds), stir with chopsticks, heat in Microwave for 15 seconds again. Add 1/4 tsp of vanilla extract, and 3/4 cup of evaporated milk (or, 1/2 cup half and half). Pour both the melted butter and the evaporated (or half and half) into the stand mixer, beat for 1 more minute; 
  4. [Dry Ingredients] Mix thoroughly 2 Tbsp baking powder, 0.5 cup corn starch, and 1.5 cups flour, Sift the dry ingredients-mix into the stand mixer; 
  5. Use a spatula to fold and mix the Dry Ingredients with the beaten liquid thoroughly. Pour the mixture into the 8”x8” glass pan.
  6. Place the glass pan (uncovered) into a steaming pot, turn on high heat till full steam, then reduce to medium heat for 30 mins. Note- The cake needs enough room to rise up (4-5" in height). The top steaming basket along with a dome-lid should be high enough. Also we need wipe the inside of the dome-lid clean, to avoid vapor drops coming onto cake surface (instead of flowing smoothly to the side of the pot). The result from our kitchen is at the top of this post.

Thursday, December 26, 2019

Fried Crispy Duck (香酥鸭)


Another duck dish! This is a traditional banquet dish, that’s originated in the provinces along the YangTze River, and nicely demonstrated in this great YouTube Video by the famous celebrity Chef, Fu Pei-Mei (in Chinese Sound Track). We made it at home with much simplified and more efficient procedure, using boiling, as we did in the Beer-braised Duck (vs steaming), up front, and pan-frying (vs deep-frying) at the end. The results were quite pleasing. An air fryer version of this recipe is also tried and written in this post (in Part V).
  1. Get a non-frozen ("fresh") duck from a Chinese market, or a frozen duck from almost any market, which needs at least 48 hrs to defrost in the fridge;
  2. Place the whole duck into a large pot (a 7.5-Qt soup pot is used in our kitchen), add water to immerse at lease 60% of the duck. Bring the pot to boil, and simmer the pot for 30 minutes (flip the duck at half way point). Take the duck out, and air-dry the for for an hour.
  3. Follow the spatchcock instructions in this excellent page to remove the duck's backbone with a poultry shear, i.e., remove ~1/2"-wide along the backbone. Flatten the duck by hand as much as possible.
  4. Add 1/2" of veggie oil into a large (10-12" in diameter) flat-bottom cooking pot (no need to add oil in this process, as the duck fat will be rendered into the veggie oil as we fry the duck). Under medium-to-high-heat, bring the oil to 350-375 degF. Note- Make sure you use veggie oil suitable for frying (i.e., oil with smoke point above 400 degF). Use a thermometer to test the oil temperature. Or use this fairly reliable empirical method: stick a single chopstick into some water, swing the chopstick vigorously to get ride of most of the water, then stick the chopstick into the oil, if you see tiny water bubbles rising up quickly from this slightly wet chopstick, the oil has reached the desired temperature range for frying. 
  5. Place the flattened duck into the oil slowly and carefully. Fry both sides of the duck till golden brown (10-15 minutes for each side, under medium-to-high-heat).
  6. Let the duck rest for 10 mins in a warm oven (by preheating the oven to 200-degF, then turning off the heat). Cut the duck with a knife and a poultry shear, before serving. The result from our kitchen is at the top of this post.

Tuesday, December 17, 2019

Some Air Fryer Recipes- Pita Chips, Potato Wedges, Crispy Duck, etc.

We bought an air fryer in early November on our way up to Northern Cal, and liked it very much, because it is versatile and it cooks much faster than a full-sized oven (hence more energy efficient). By our calculation, each of the 5 recipes below uses less then 1 kw-hr, i.e., 1 killoWatts-Hour of electricity, for cooking.

Except for the crispy duck dish (in Part V), the recipes below are all available on the internet. Just search your favorite dish by name, and add "air fryer" at the end of your search phrase. You might have to adjust the cooking time a bit, to fit better with your air fryer settings and your taste preferences. It's worth noting that we've tried "air-frying" frozen egg rolls without much success, and went back to pan-frying (i.e., to pan fry the egg rolls in small amount of oil slowly, under low-to-medium heat).  In the near future, we might try curly fries and blooming onion, just for fun. Incidentally we bought a Gourmia 6-qt air fryer from Costco (GAF685, 1700 watts, $49.99+tax, with a $30 discount before Thanksgiving).

I. Pita Chips
  1. Separate 2 pieces of pita bread into single layer. Note- Each pita bread, being a pocket, is separated into two single layers;
  2. Scissor-cut each single layer of pita bread into wedges (in similar size as tortilla chips);
  3. Place the wedges into the air fryer in one layer, and lightly spray on some veggie oil (or toss in a mixing bowl with 2-3 tsp of olive oil or veggie oil), and optionally, a pinch of salt.  Note- Make your own veggie oil spray, by mixing equal parts of veggie oil and water in a spray bottle, shake and use.
  4. Cook in air fryer at 385degF for 7 minuets;
  5. Serve with guacamole or hummus. Here is the result from our kitchen-
II. Non-breaded Fried Chicken Thighs
  1. Rinse 4pcs of chicken thighs (with skin & bone), pat dry with paper towel, or air dry on a baking pan. Note- smaller air fryer might only fit 2-3 pieces of thigh in one layer.
  2. Rubbing both sides of the chicken thigh, with 1/4 tsp of "salt and 5-spices mix" (salt to 5-spices in 2:1 ratio, 1/8 tsp on each side). Marinate for 1-2 hrs. Note- Salt and pepper mix can be used instead of salt and 5-spices. Marinating 6-8 hours (i.e., overnight or over a day) could make the meat a bit salty. Simply going lighter with the seasoning mix on the non-skin side of the meat would make the result work equally well, even after 6-8 hours of marinating. 
  3. Cook skin-side-up in air fryer at 375degF for 25 minutes. Note- No Need to add oil in this case (the skin will provide more than enough oil for the "air-frying").  Might consider placing the air fryer outdoor or under the kitchen hood, to ventilate the air properly.
  4. Let the thighs rest for 10 mins in the air fryer, or in a warm oven (preheat the oven to 200-degF, then turn off heat), before serving. Here is the result from our kitchen-
III. Potato Wedges
  1. Rinse and brush clean 6 red potatoes or 4 small-to-medium-sized potatoes (no need to peel the skin), then cut into large wedges, i.e., ~1”-size large pieces;
  2. Toss dry in a colander, or line a baking pan with paper towel and toss dry the potato wedges;
  3. In a mixing bowl, toss the wedges with dry rubs (see Note) and 2-3 tsp of veggie oil. Note- My Dry Rubs- 1/2 tsp salt, 1/4 tsp black pepper, 1/4 tsp cayenne pepper (optional), 1/4 tsp paprika, 1/4 tsp garlic powder;
  4. Immediately lay the wedges on the air fryer trey in one layer. Note- let potato wedges sit will force fluid out of the wedges;
  5. Cook in air fryer at 400degF for 20 mins.
IV. French Fries
  1. Rinse and brush clean 2 small-to-medium-sized potatoes (no need to peel the skin). Cut the potatoes into ~1/4” slices. Note- here is a nice video on how to cut a potato into French Fries slices;
  2. Line baking pan with paper towel and toss dry the potato slices a bit;
  3. In a mixing bowl, toss with dry rubs (see note) and 2-3 tsp of veggie oil. Note- My Dry Rubs- 1/4 tsp salt, 1/4 tsp black pepper, 1/4 tsp cayenne pepper (optional), 1/4 tsp paprika, 1/4 tsp garlic powder;
  4. Immediately lay the wedges on the air fryer trey in one layerNote- let potato slices sit will force fluid out of the slices;
  5. Cook in air fryer at 400degF for 15 mins. Here is the result from our kitchen-
V. Fried Crispy Duck (香酥鸭): this is an air-fryer version of the traditional crispy duck in this post.
  1. Get a non-frozen ("fresh") duck from a Chinese market, or a frozen duck from almost any market, which needs at least 48 hrs to defrost in the fridge. Follow the spatchcock instructions in this excellent page to remove the duck's backbone with a poultry shear, and then separate the duck into 2 halves vertically (see photo below for a half duck);
  2. For each pound of the half duck, dry rub both sides of the duck with 1/2 tsp of "salt and 5-spices mix" (salt to 5-spices in 2:1 ratio, 1/4 tsp per pound on each side), and marinate for 1-2 hrs (6-8 hrs for stronger flavor);
  3. Cook in air fryer at 400degF for 30 mins (see next step for medium to medium-rare doneness of the meat). Note- Might consider placing the air fryer outdoor or under the kitchen hood, to ventilate the air properly.
  4. Let the half duck rest for 10 mins in the air fryer, for the duck meat to reach medium doneness. Taking the duck out of the air fryer right after 30 minutes and placing it in a warm oven (by preheating the oven to 200-degF, then turning off the heat) would get the duck meat to medium-rare doneness. When both halves of the duck are cooked, cut the duck with a knife and a poultry shear, before serving. Note- Leaving the duck in the air fryer at 400 degF after 30 minutes of cooking allows the meat to cook a bit more in the residual heat. Here is the result from our kitchen- 

Saturday, December 22, 2018

Mugwort Rice Cake (艾草粿)

This is a traditional Hakka (客家) pastry, a savory rice cake with truly unique flavors when using the fillings described below. It stands nicely side by side with the Taiwanese Turtle-shaped Red Rice Cake (紅龜粿), a sweet pastry we posted in early December.

Ingredients
Rice Flours- Glutinous (Green)
  1. Glutinous Rice Powder, 2 cups, plus an extra 1/4 cup set aside for later use, in [Methods III-Step 6] when kneading the dough (available from any Chinese Market, use the Green Bag shown in the product package picture). 
  2. Rice Powder (regular, non-glutinous) 1/2 cup (use the Red Bag in the product package picture).
  3. Sugar, 1/4 cup.
  4. Mugwort powder, 2/3 Tbsp (艾草粉, available from some Chinese Herbal Medicine stores, 参茸行; see product package below). Note- Mugwort is a weed-like plant that's grown around the world, including Southern California. We finally got hold of the plant. Here is how to process fresh Mugwort: Pick some mugwort leaves, rinse thoroughly, cook in boiling water till soft, drain all the water, squeeze into 2" balls, and freeze for later use. When ready to use, defrost a single ball, grind it into paste form with a food processor (or mince finely with a knife), then mix the mugwort paste into the water that's used with the rice powder below, in Method III.
    Mugwort Powder
  5. Banana Leaves (available in a frozen package from some Chinese Markets).
  6. Vegetable oil, and a brush
  7. Internal Fillings I- Dried Turnip Slices (菜脯米), 2 cups. Note- ~6 lbs of Turnip, rinse and brush thoroughly (no need to peel, trim off both ends), julienne-slice into thicker slices, sun-dry or oven-dry into thin slices as shown in the picture below. Note- It takes ~3.5 hours in the oven at 300-degF (spread 6-lbs of turnip slices out onto two half-sheet baking pans, stir and turn with a spatula every 30 minutes till the thicker turnip slices turn into ~1 lb of thin slices, in golden color, ~3.5 cups). According to several online recipes (written in Chinese), it takes 2-3 days under full sun to make this ingredient, a much more energy efficient approach (will try in the summer, and update).
    Dried Turnip Slices
  8. Internal Fillings II-  Ground Pork ~1/4 lb (Marinate 30 minutes, with cornstarch/1 tsp, rice cooking wine/1 Tbsp, soy sauce/1 Tbsp).
  9. Internal Fillings III- Reconstituted Dry Mushroom (10-12 dry mushrooms soaked in water for 1-2 hours, and mince), Dry Shrimp (15-20 small-sized dry shrimps soaked in water for 1-2 hours, each chopped into 2-3 smaller pieces), Shrimp Shells (1-1.5 Tbsp of shrimp shells soaked in water for an hour, and mince). Note- shrimp shells are actually tiny shrimps with virtually no flesh (hence the name, shrimp shells, see product package below). 
  10. Internal Fillings IV-  Fried Shallots, 2 Tbsp; Soy Sauce, 2 Tbsp; Rice Cooking Wine, 2 Tbsp; White Pepper, 1/2 tsp; Salt 1/2 tsp; sugar 1 tsp.
    Shrimp Shell

Methods I- Prep Work
  1. Defrost the banana leaves. Cut banana leaves into 10-12 ovals, each slightly larger than average palm size.
  2. Setup the steamer pot, with two layers of steam baskets.
  3. Add 1-2 Tbsp of veggie oil into a small plate. Brush a thin layer of veggie oil onto the banana leave ovals, and set them aside.
  4. Set the veggie oil and brush aside (to brush on the surface of the rice cake after steaming).
Methods II- Make the Cake Fillings
  1. Add 1 Tbsp of Veggie Oil into a flat-bottom cooking pot, turn on medium heat for a minute. Add the ground pork into the pot. Press the ground pork flat with a spatula, then stir, and press flat again. Repeat until the ground pork is no longer clumped together. Take out and set aside.
  2. Add 1 Tbsp of Veggie Oil into the cooking pot again, turn on medium heat for a minute. Add  minced dried mushroom, dry shrimp, and dry shrimp shells (Internal Fillings III) into the pot, stir and mix until fragrant.
  3. Add the ground pork back into the pot. Stir for a minute.
  4. Add 2 cups of Turnip Slices (Internal Fillings I) into the pot, stir and mix.
  5. Add all the seasonings in Internal Fillings IV into the pot, stir and mix for 2-3 minutes. Turn off heat, and set aside.
Methods III- Make the Cake Skin
  1. In a large mixing bowl, add 2 cups of Glutinous Rice Powder (from Green Package), 1/2 cup of Rice Powder (regular, non-glutinous, from Red Package), and 1/4 cup of sugar.
  2. Add 1.25 cup of water into a 2-cup measuring cup. Note- As a general rule, for 2.5 cups of rice powders, use 1.25 cup of water (water is half in volume).
  3. Gradually pour ~1 cup of the water into the mixing bowl, while stirring the rice powder mix with a pair of chopsticks (pour up to 1 cup of water, and stop). The rice powder should be in clump form after 1 cup of water is into the mixing bowl. Now hand-knead the rice powder clumps into a dough. Add small amount of water as needed, until the the dough is smooth, and slightly hard (not soft, because more water content will be introduced in the following steps).
  4. Take out ~1/10 of the dough and separate this part of the dough into 6-8 smaller pieces, each rolled into a small ball. Boil 1"-deep water in a small pot, and drop the 6-8 small balls into the boiling water. Now, cook till the balls float up. Take the balls out with a skimmer, i.e., a soup ladle with holes. Note- These boiled rice balls, called rice cake core (粿粹, in Chinese), will be rolled back into the bigger dough, to give the dough more structure, and the cake skin more texture (to function similarly as gluten in the flour).
  5. Scoop ~1 Tbsp of Mugwort powder into a small bowl, add ~1 Tbsp of water, grind the the powder into the water (with a spoon), until the powder is thoroughly mixed into paste form.
  6. Press the larger dough in the large mixing bowl flat, place on top of the flattened dough with- (1) the cooked rice balls (from Step 4), and (2) ~2/3 of the mugwort paste (from Step 5, need to split the paste into 4-5 small pinches). Now roll the dough (with the rice balls and mugwort pinches wrapped inside), till the dough is smooth and the surface of the dough showing tiny green spots. Add dry glutinous rice powder a little a time (up to 1 Tbsp a time), if the dough is too wet from the newly introduced water content. 
  7. Separate the dough into 10-12 equal portions. Roll each portion into a ball, and then, press each ball into a flat round (2-to-3-inches in diameter). Note- Cover the dough that's not being used with a damp cloth.
Methods IV- Making and Steaming the Cakes
  1. Scoop a large spoonful of cake fillings onto the center of the flat round skin. Bunch the flat round tightly together at the top (like how you make Xiao-Long-Baos, with no worries about the nice wrinkles at the top). 
  2. Brush a thin layer of veggie oil on one banana leaf oval. Press each bao-shaped dough portion (with filling inside) onto a banana leaf oval. Now shape the bao with your palm into an oval. 
  3. Steam the oval-shaped cakes in a steaming pot, in two-layers of steaming baskets, for ~10 minutes. Note- Bring the steaming pot to boil (without steaming baskets). Then add the steaming baskets on top of the steaming pot, and bring the pot to full steam (i.e., till  you can see steam coming out of the top or the side of the lid). Now reduce the heat to medium. Steam for 4-5 minuets, take each steaming basket out and tilt it slightly to drain any vapor/water from the top of the pastry. Now swap the top basket with the bottom basket, bring the pot to full steam again, and steam for another 4-5 minutes. I use a 12-inch steaming pot. Each layer of steaming basket allows 5-6 ovals. 
  4. Take the lid off right away, tilt the steaming basket to let vapor fluid flow off from the surface of the cakes. Now, brush a thin layer of veggie oil on the surface of each cake. The outcome from our kitchen is shown at the top of this post.
Methods V- Reheating the Cakes
  1. The cakes can be easily stored in fridge for days, and in freezer for weeks.
  2. To reheat, defrost (if frozen), and place the cake(s) on a dry frying pan (without oil). Turn on low-to-medium heat, and heat for 3-4 minutes each side.

Thursday, December 13, 2018

Turtle-shaped Red Rice Cake (紅龜粿)

In ‘Chinese Snacks’, one of the well-written bilingual (English-Chinese) Wei-Chuan Recipe Books (味全食譜), the brilliant picture of a bright red turtle-shaped rice cake (紅龜粿) caught Papa’s attention and brought back lots of fond memories about the culture of making traditional foods back in Taiwan, where Papa spent his formative years. Ever since then Papa was on a quest to find a pastry mold with turtle pattern (紅龜粿模).  On a recent trip back to Taipei, a dear friend surprised Papa by making a special trip to acquire such a mold from the renowned wholesale district in the city, Di-Hwa Street (廸化街). A picture of the solid wood pastry mold is proudly presented below. The pastry mold itself is only symbolic, to express a pastry maker’s wish for everyone to enjoy longevity and long-lasting peace of mind. In fact this rice cake can be made without the mold, and tastes equally delicious, as suggested in Step 7 below.

Ingredients
  1. A pastry mold with turtle pattern (see picture above).
  2. Glutinous Rice Powder, 2 cups, plus an extra 1/4 cup set aside for later use, in Step 6 below (available from any Chinese Market, use the Green Bag as shown in the product package picture below).
  3. Rice Powder (regular, non-glutinous) 1/2 cup (use the Red Bag in the product package picture).
  4. Sugar, 1/4 cup.
  5. Beetroot Powder, 0.5 Tbsp (i.e., 1.5 tsp, as a natural red color source, available online or from a health food store). Note- FDA-approved Food Color can be used to produce more vivid red color. Other untested natural red color sources might include red rice yeast (紅麴), roselle flower (洛神花), dragon fruit (火龍果), and beetroot from the market veggie section (甜菜根).
  6. Banana Leaves (available from the frozen package in some Chinese Markets).
  7. Vegetable oil, with a brush.
  8. For the internal fillings- a can of Red Bean Paste (from any Chinese Market), or Mung Bean Paste (following instructions in this previous post).
Method
  1. Defrost the banana leaves. Cut banana leaves into 6 oval shapes,, each slightly larger than the turtle shape of the pastry mold.
  2. In a large mixing bowl, add 2 cups of Glutinous Rice Powder (from Green Package), 1/2 cup of Rice Powder (regular, non-glutinous, from Red Package), and 1/4 cup of sugar.
  3. Heat 1.25 cup of water in Microwave for 1 minute (using a 2-cup measuring cup). Add 0.5 Tbsp (i.e.,m 1.5 tsp) of Beetroot Powder into the cup, stir and mix until the Beetroot Powder is fully dissolved. Note- As a general rule, for 2.5 cups of rice powder, use 1.25 cup of water (waster is half in volume).
  4. Gradually pour ~1 cup of the beetroot water mix into the mixing bowl, while stirring the rice powder mix with a pair of chopsticks. The rice powder should be in clump form when 1-cup of beetroot mix is poured into the mixing bowl. Now hand-knead the rice powder clumps into a dough. Add small amount of water as needed, until the the dough is smooth, and slightly hard (not soft, because more water content will be introduced in the following steps).
  5. Take out ~1/10 of the dough and separate this part of the dough into 6-8 smaller pieces, each rolled into a small ball. Boil 1"-deep water in a small pot, and drop the 6-8 small balls into the boiling water. Now, cook till the balls float up. Take the balls out with a skimmer, i.e., a soup ladle with holes. Note- These boiled rice balls, called rice cake core (粿粹, in Chinese), will be rolled back into the bigger dough, to give the dough more structure, and the cake skin more texture (to function similarly as gluten in the flour).
  6. Press the larger dough in the large mixing bowl flat, and place on top of the flattened dough with the cooked rice balls (from Step 5). Now roll the dough with the rice balls wrapped inside, till the dough is smooth. Add dry glutinous rice powder a little a time (up to 1 Tbsp a time), if the dough is too wet from the newly introduced water content.
  7. Separate the dough into 6 equal portions. Roll each portion into a ball, and then, press each ball into a 2-to-3-inch flat round. Note- Cover the dough that's not being used with a damp cloth.
  8. Scoop a large spoonful of red bean paste (or mung bean paste) onto the center of the flat round. Bunch the flat round tightly together at the top (like how you make Xiao-Long-Baos, with no worries about the nice wrinkles at the top)). 
  9. Brush a thin layer of veggie oil on the pastry mold, and on top of the oval shaped banana leaf.  Press each bao-shaped dough portion into the mold firmly. And then place the mold on top of an oval shaped banana left, to let the now turtle-imprinted dough piece fall naturally on the banana leaf. Note- This pastry can be made without using a pastry mold. Simply press each bao-shaped dough portion into flat oval shape with your palm, and set it on an oval shaped banana leaf. 
  10. Steam the turtle-shaped pastries in a steaming pot, in two-layers of steaming baskets, for ~8 minutes (NOT much longer than 8 minutes), at medium heat (not high heat). Note- Bring the steaming pot to boil (without the steaming baskets). Then add the steaming baskets on top of the steaming pot. Now reduce the heat to medium, and steam for 8 minuets. Do NOT steam much longer than 8 minutes (over-steaming will cause the pastry to soften and fall flat on its own weight). I use a 12-inch stainless steaming pot with two layers of steaming baskets. Each layer of steaming basket allows up to 4 turtles. The lower basket seems to get a lot of vapor drops from the bottom of the top basket and the turtles become flatter in shape and paler in color. The top basket doesn't seem to have this problem, from the dome lid. Note- Will try bamboo steamer baskets next time.
  11. Take the lid off right away, tilt the steaming basket to let vapor fluid flow off from the pastry pieces. Now, brush a thin layer of veggie oil on the surface of each pastry piece. Here is an outcome from our kitchen-
  12. The pastry pieces can be easily stored in fridge for days, and in freezer for weeks. To reheat, defrost (if frozen), and place the pastry pieces on a dry frying pan (without oil). Turn on low-to-medium heat, and heat for 3-4 minutes each side.


Monday, December 10, 2018

Beer Braised Duck (啤酒鴨)

This is a nice duck dish, a whole duck nonetheless, which might be a candidate for a holiday main dish. I read about this dish in one of my favorite novels on the net. The simplicity in its making is quite surprising and delightful, esp. when compared with how a Peking Duck or a no-frills roasted duck is cooked. There is no guess work, and no uncertainty involved in cooking this dish, which is a dream come true for Papa, a mere mortal in the cooking world. The beer-factor makes it more intriguing, but the beer serves some real purposes. It tenderizes the duck meat and makes the meat very flavorful. This recipe combines and modifies two online recipes, an excellent video and a great blog entry (both in Chinese).

I. Ingredients
  1. Equipment- Need a large pot or wok that could allow a whole duck to be placed inside when the lid is tightly closed. I use a Belgique Hard-Anodized 7.5-Qt. Pot. A 14-inch flat bottom wok should also work. A nicely fit lid is a must for cooking this dish.
  2. Whole Duck- A 4-to-6-pound frozen whole duck can be obtained from almost any market (call to check first). Defrost completely (36-48 hours in the fridge, or 4-6 hours when submerged in cold water by changing water every 30 minutes, see product package for more info). Empty all contents in the cavity of the duck, rinse thoroughly inside and out. Cut off extra skin from the neck area, and the end (~1.5”) from the tail. Truss the wings with butcher string (or kitchen twine) to prevent them from flapping around (no need to truss the legs).
  3. 2 cans of beer- any 12-oz (360-cc) beer will do.
  4. Ancillary ingredients- green onion (1-2 stalks, rinse and tie into a knot), ginger (4-6 thick slices), brown sugar (1/4 cup), soy sauce (1 cup), salt (1/2 tsp per pound of duck, up to 2tsp max). 
  5. One cup of rice cooking wine, or shaoxing cooking wine, if you plan to make duck soup later 
II. Method
  1. Immerse a whole duck in water in a large pot (see Ingredients-1), add the green onions and ginger slices from Ingredients-4 into the pot, bring the pot to boil, and reduce the heat to simmer for 30 minutes. Close the lid tightly. Turn the duck every 10 minutes (let the water flow into the inside chamber of the duck). Note- This step renders most, if not all, of the duck fat under its skin. Add one cup of rice cooking wine (or shaoxing cooking wine), if you plan to make duck soup later.
  2. Take the duck out, rinse out any debris from the duck, inside and out. Let the duck sit on a cutting board. Pour the fluid out of the pot carefully into a smaller soup pot, to save for a duck soup, if desired (see the last step below). Set the green onions and ginger slices aside. Rinse the pot to rid of all the debris. Note- Remove the debris from the surface of the leftover fluid as well, if making a soup later.
  3. Put all the rest of the Ancillary Ingredients (see Ingredients-4) into the pot. Turn on medium heat. Stir and mix all the ingredients thoroughly. Place the green onions and ginger slices back into the pot (or use fresh green onions and ginger slices).
  4. Place the duck inside the pot. Pour in the beer slowly. Bring the pot to boil at medium heat, and let simmer for 60 minutes with the lid tightly closed. Turn the duck every 15 minutes (to cook and color both sides evenly). Note- I turn the duck with two strong angled-wood-spatulas, as the pot is filled with steaming-hot beer sauce and the duck is a bit unwieldy from its weight and size. 
  5. At the end of 60 minutes, take the duck out, place it on a large plate, ladle the sauce on top, and serve. Note- It's quite reasonable to carve the duck into 2 pieces of leg and thigh, and 2 pieces of duck breasts, and then slice the duck meat delicately at an angle, garnish and serve. Search "How to Carve a Duck" to see how a duck can be neatly cut.  After carving, what's left of the duck can go into a pot with the fluid drained from Step 2, and be made into a tasty duck soup (season to taste with salt).

Saturday, December 1, 2018

Celery and Jelly Fish (西芹海蜇)

This simple cold dish is delicious, and often appears as one of the appetizers in a banquet.

Ingredients
  1. Celery, 3-4 stalks. 
  2. Jelly Fish Heads (海蜇頭), 14oz (see product image- it’s key to get jelly fish heads, in nodules, not the jelly fish, in sheets). Note- bean-curd-slices (干絲) works well as a substitute (need to blanch for 15-20 minutes till soft, or immerse in baking soda water first, then blanch for 2-3 minutes, stay tuned for update on this).
    Jelly Fish Heads
Method
  1. Immerse jelly fish heads in water until they no longer taste salty (6-8 hours, change water 3-4 times, every 1.5-2 hours). To taste, wipe the surface with your finger, and take a quick lick at the finger.
  2. Chop the jelly fish heads into bite-size pieces. 
  3. Chop celery into bite-size chunks. Blanch in boiling water for 1-2 minutes. Take out and set aside. Note- Many recipes advocate peeling fiber from the celery stalk.surface, by cutting a stalk halfway in depth on the concave side of the stalk, at the half-length point, then separating the stalk gently while peeling the fiber off from the convex side of the stalk. Papa thinks blanching alone is sufficient (fiber is good for our digestive system after all).
  4. Let the boiling water (used for blanching celery chunks) cool for 2-3 minutes (for the water temperature to go down to ~180 degF).
  5. Place the jelly fish pieces in a strainer, and let the strainer sit over an empty large ceramic bowl. Now pour the hot (but no longer boiling) water slowly into the strainer (with the water being collected in the ceramic bowl).
  6. Leave the jelly fish pieces sit in the hot water for ~10 seconds (but not much longer). Pick up the strainer and set aside the jelly fish pieces. Note- Jelly fish pieces will shrink and harden if left in boiling water, or hot water, for too long.  
  7. Place the celery chunks and the jelly fish pieces in a mixing bowl.  Stir, and mix, then season to taste, starting with salt/0.25tsp, light soy sauce/1tsp, sugar/1Tbsp, and rice vinegar/1Tbsp. The outcome from our kitchen is at the top of this post. Note- Use light soy sauce only, in small quantity. Keep in mind that this is a light-colored cold dish. 

Monday, October 22, 2018

Mung Bean Jelly (綠豆涼粉)

Here is a nice cold dish for the summer, or an appetizer for any season:


I. Ingredients
  1. 1 cup of Mung Bean Starch powder, from any Chinese Market (see product package below). Note- The product package shows "Green" Bean Starch, in English, a misnomer.
  2. A nonstick 8" x 8" x 1" baking pan. Note- Need the 1" depth to hold the boiling hot jelly safely, in Step 3 below.

II. Mung Bean Jelly
  1. Add 1/2 cup of mung bean starch powder into a 1-cup measuring cup.  Slowly pour in 1/2 cup of water, and stir till fully dissolved. 
  2. Boil 3.5 cups of water in a medium-sized pot, and let simmer at low heat. Gradually pour in the starch mixture prepared in Step 1, while stirring constantly till bubbles come up to the surface consistently and the mixture level starts to rise (by now mixture in the pot turns somewhat-transparent). Turn off heat. Note- Use 3 cups of water (vs 3.5 cups above), for slightly harder jelly. Also, corn starch can be used if mung bean starch is hard to find. Use 2.5 cups of water in Step 2 (vs 3.5 cups), because Corn Starch Jelly ends up much more watery.
  3. Slowly and gradually pour the boiling hot mixture into a nonstick 8" x 8" x 1" baking pan. Let sit for 2-3 hours at room temperature.  
  4. Insert a plastic knife around the edges of the jelly pan, and carefully flip the jelly out onto a large plate. Cut the jelly into 1/2" x 1/2" x 1" slices, and add into the Smashed Cucumber Salad we posted early. Note- Keep the unused jelly at room temperature, because refrigeration hardens the jelly. 

Saturday, October 20, 2018

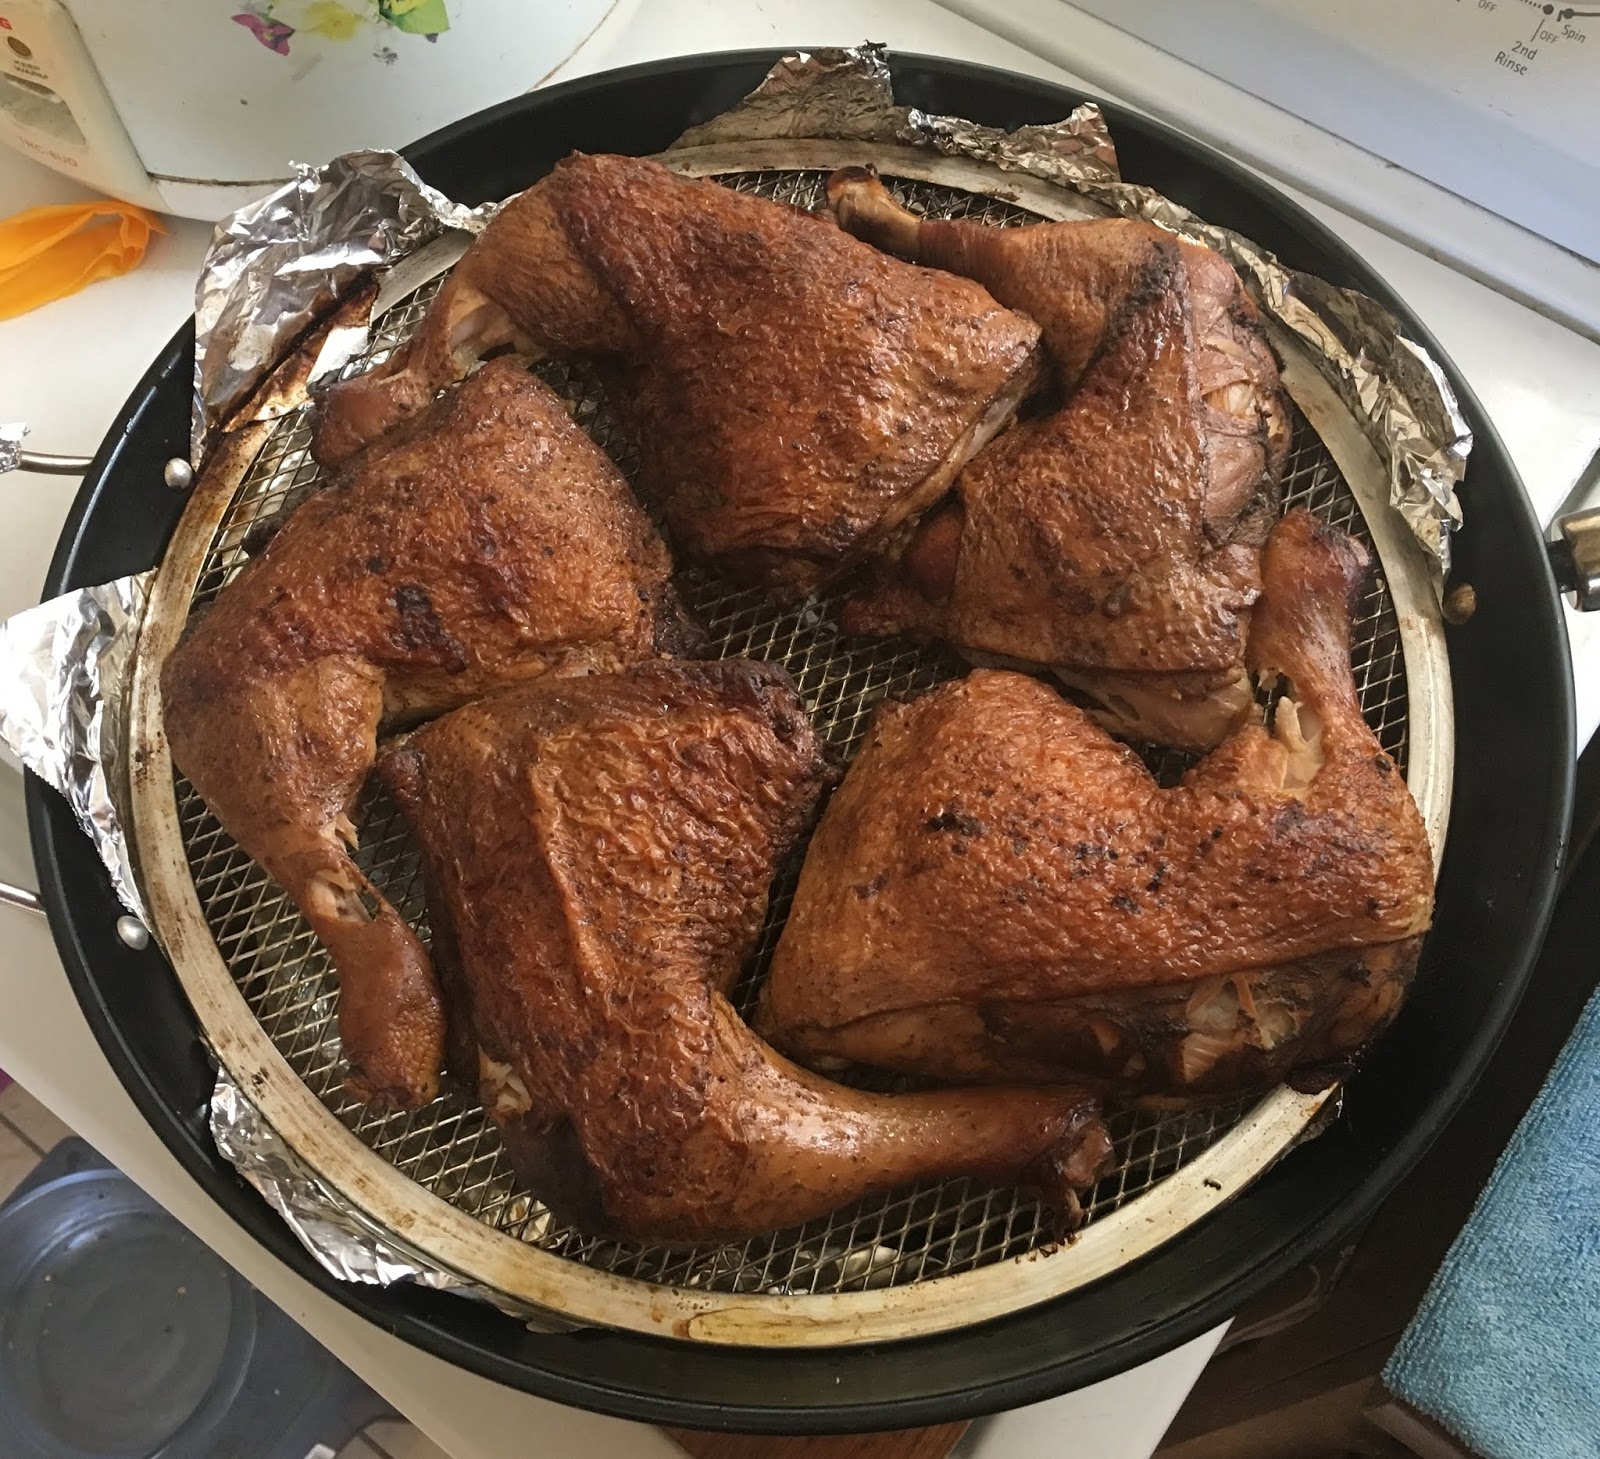
Smoked Chicken and Smoked Pork Ribs (燻雞、燻小排)

Using a regular no-frills BBQ Gas Grill as a smoker seems an interesting thing to try, for making Chinese-style Smoked Chicken (燻雞), Smoked Pork Ribs (燻小排), and in the future, Smoked Pork (湖南臘肉), for the Chinese New Year. For one thing, the smoke generated in the cooking process is easily dispersed, because this is outdoor cooking. And then, the grill gets used into the autumn, and maybe even, the winter.

I. Ingredients
  1. Smoking Equipment- A no-frills BBQ Gas Grill. A large wok (12"-14") with a lid, a steaming plate (or a pizza screen), or a large steamer pot, and aluminum foil. Note- Use a beaten-up old wok or steamer pot, as shown above and in this excellent video (using a steamer pot), because direct fire underneath is pretty harsh on the equipment. I found my inexpensive 13.75" wok (without lid), as shown above, from Walmart. A well-fit dome-lid that is trapping the smoke inside can be easily found online or from stores, and it's a worthwhile investment, because it's reusable across woks (see picture below). A dome-lid allows room for a whole chicken, or duck, underneath. Note- The wok's wooden handles are wrapped with aluminum foils to avoid being burnt into ashes on top of the grill. In addition, an old 3-burner gas grill, burning natural gas, not propane, is used here. 
  2. Smoke-Producing Ingredients- 1/4 cup of flour (any type), 1/4 cup of raw rice (any kind), 1/4 cup of brown sugar, 3-4 Tbsp of Dry Tea Leaves (or 2 Tbsp of fine-grained tea ground; use green, red or black tea, but not herbal tea).
  3. For Part II- 4-6 pounds of chicken leg and thigh, or chicken leg quarters (with skin and bone). For marinating, 1/2 tsp of salt and 1/4 tsp of five spices per pound.
  4. For Part III- A full rack of baby back ribs. For marinating, 1/2 tsp of salt and 1/4 tsp of five spices per pound.
II. Smoked Chicken (燻雞)
  1. [Marinating] Marinate 4-6 pounds of chicken leg and thigh, or chicken leg quarters (with skin and bone), by rubbing ~1/2 tsp of salt and 1/4 tsp of five spices per pound, on both sides (mix salt and five spices first, and rub evenly with hand). Let sit in open air in fridge over night, or 4-6 hours. Drain any fluid, and wipe both sides of the chicken with a slightly damp (NOT wet) paper towel to make sure the seasoning is evenly spread on the meat. 
  2. [Searing] Sear the chicken pieces skin-side-down till the skin is golden, in a dry pan (with no oil, at medium heat, on a regular stove indoor).
  3. Place two large sheets of aluminum foil in a cross pattern at the bottom of the wok (as seen in the top picture). Spread the mix of the Smoke-Producing Ingredients evenly on the foil.  Add another large piece of foil that's poked with some holes (by a fork) on top of the Smoke-Producing Ingredients. Now add a pizza screen or a steaming plate on top of the top layer foil. 
  4. Place the chicken pieces skin-side-up on the pizza screen (or steaming plate). Cover the wok with the lid securely, and place the wok on top of the grill grate. Note- Might consider placing a coffee mug on top of the center of the lid, to ensure the lid is closed tightly (with added weight). 
  5. Turn on the BBQ Grill burner to high heat under the wok. Once the smoke starts to escape from the edge of the lid, turn the heat to medium-low or low, and smoke for another 60-65 minutes.  Note- For chicken, internal temperature needs to reach 165-degF, or, no pink fluid when cutting open a thick-meaty part (roughly, 10-12 minuets per pound for leg and thigh, and 12-15 minuets per pound for a whole chicken). 
  6. Take the chicken pieces out, let them rest for 5-10 minutes (tent with aluminum foil to keep warm), before carving and serving with greens or salads.The outcome from our grill is shown below.
III. Smoked Pork Ribs (燻小排)
  1. [Boiling] Get a full rack of baby back ribs, and cut it into two half-racks. Immerse the two halves in water in a large pot, bring to boil and let simmer for 30 minutes.
  2. [Marinating] Marinate the ribs, by rubbing ~1/2 tsp of salt and 1/4 tsp of five spices per pound, on both sides (mix salt and five spices first, and rub evenly with hand). Let sit in open air in fridge over night, or 4-6 hours. Drain any fluid, and wipe both sides of the ribs with a slightly damp (NOT wet) paper towel to make sure the seasoning is evenly spread on the meat. 
  3. Place two large sheets of aluminum foil in a cross pattern at the bottom of the wok (as seen in the top picture). Spread the mix of the Shmoke-Producing Ingredients evenly on the foil.  Add another large piece of foil that's poked with some holes (by a fork) on top of the Smoke-Producing Ingredients. Now add a pizza screen or a steaming plate on top of the top layer foil. 
  4. Place the ribs meat-side-up on the pizza screen (or steaming plate). Cover the wok with the lid securely, and place the wok on top of the grill grate. Note- Might consider placing a coffee mug on top of the center of the lid, to ensure the lid is closed tightly (with added weight).
  5. Turn on the BBQ Grill burner to high heat under the wok. Once the smoke starts to escape from the edge of the lid, turn the heat to medium-low or low, and smoke for another 60 minutes. Note- After boiling for 30 minutes in Step 1, the ribs are almost fully cooked.
  6. Take the ribs out, let them rest for 5-10 minutes (tent with aluminum foil to keep warm), before carving and serving with greens or salads. The outcome from our grill is shown at the top of this post.