- After rinsing rice thoroughly (using a mixing bowl) and draining water (with a strainer), immerse 1 cup of rice in 1 cup of water for an hour, then stir in 1/2 tsp of veggie oil.
- Coat a thin layer of vegi oil inside a 6"clay pot, then put the rice and water in. Note- For an 8" clay pot, use 2 cups of rice soaked in 2 cups of water for an hour (stirring in 1 tsp of veggie oil at the end).
- Bring the pot to boil on a stove (with lid off, 6-8 minutes), cover the lid partially and let simmer till no more boiling water on top of rice (3-4 minutes, water will overflow if the lid is covered completely at this point), cover the lid and continue to cook at low heat for 10 minutes. Note- In case you haven't noticed, this is the time-tested traditional method of cooking rice, before the invention of Rice Cookers. A slightly burnt crust of rice (鍋粑) will form at the bottom of the pot, which is the part I like the most.
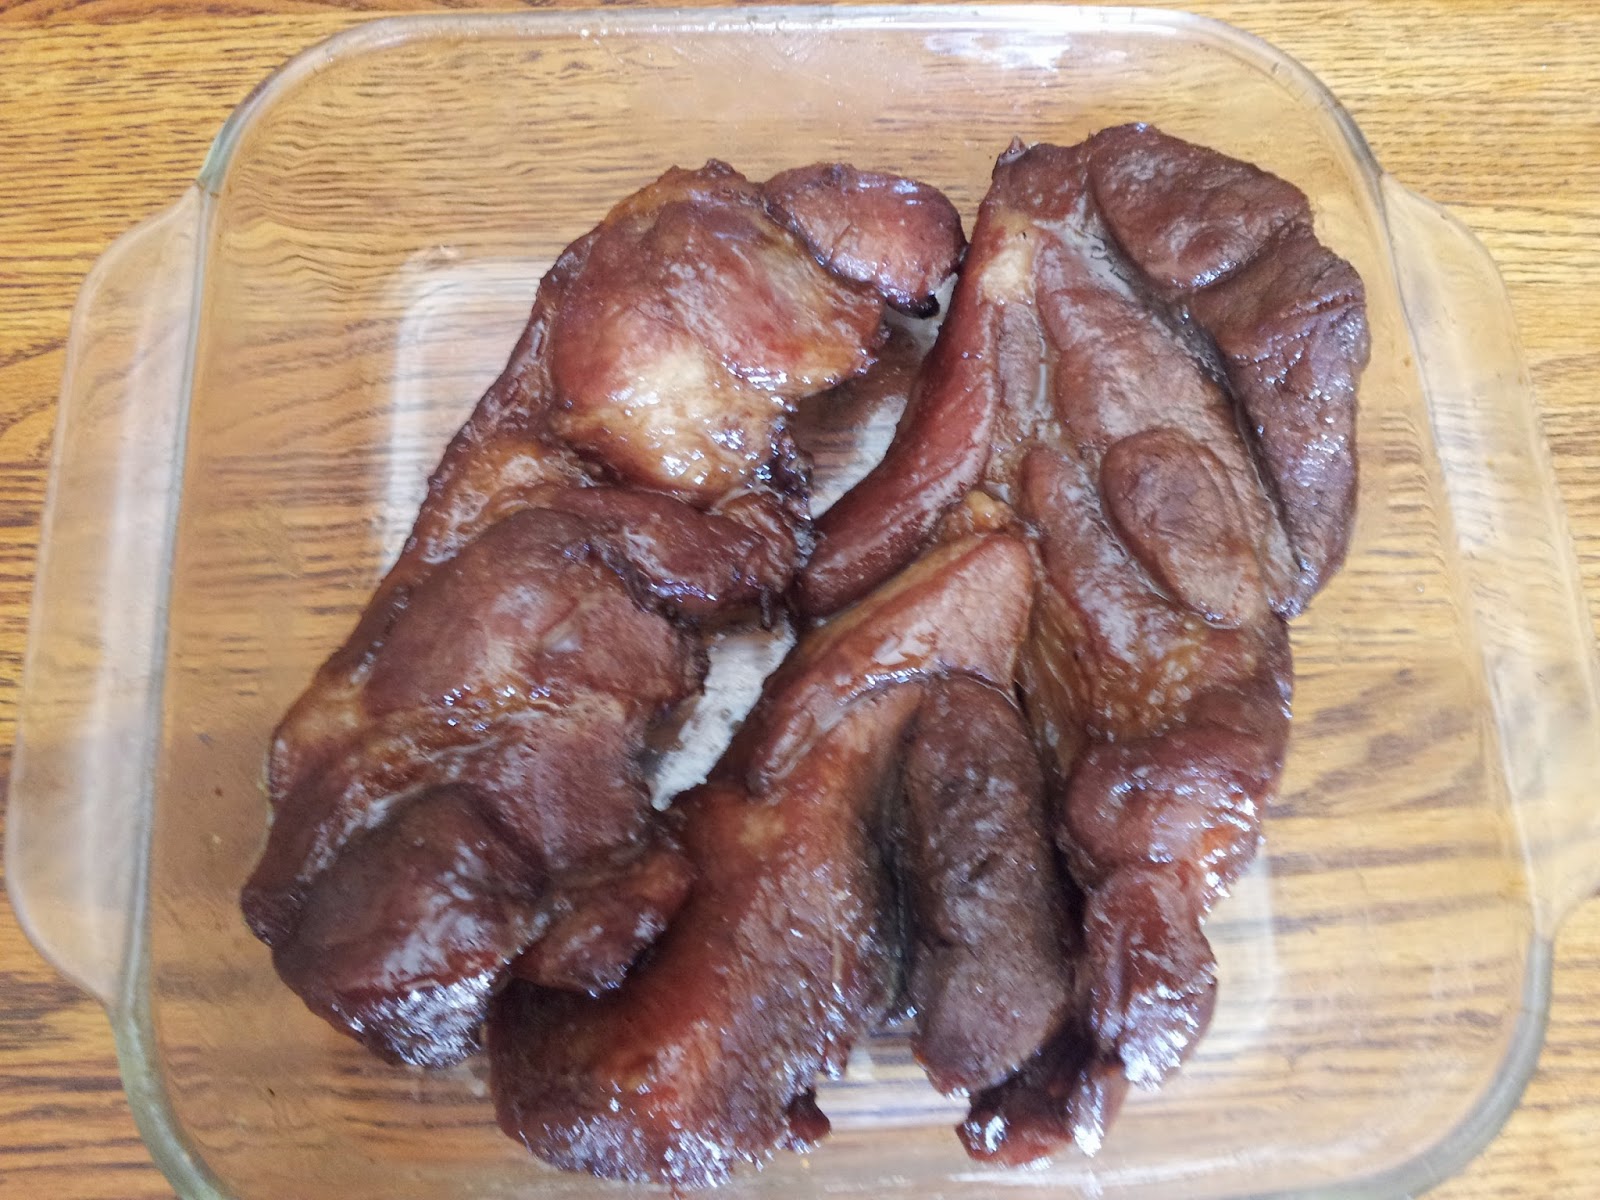
- Add sliced Chinese sausages (香腸), Chinese smoked ham (臘肉), Chinese BBQ pork (叉燒) on top of rice, cover the lid and cook at low heat for 5 more minutes, turn off heat, and cook in residual heat for 15 minutes minutes or longer. Note- After adding meat slices on top, the pot can be moved into an oven, and baked for 15 minutes at 400-deg-F according to some online sources, but I have not tried that method.
- Blanch your favorite leafy vegetable and place on top of the rice, and serve. Here is a finished product.
- Prepare seasoning sauce for cooked rice by mixing 1 tablespoon of oyster sauce with 2 tablespoons of soy sauce and 3-4 tablespoons of drinking water. Sprinkle seasoning sauce on rice and serve with the sliced meat.

Wednesday, October 29, 2014
Clay-pot baked rice with Chinese sausages and Chinese smoked ham (臘味堡仔飯)
This seems to be quite a unique dish available in Southern California Cantonese restaurants. Not sure if it is available elsewhere in US.
Sunday, October 26, 2014
Cantonese Yang Zhou Fried Rice (揚州炒飯)
Yang Zhou Fried Rice is a popular dish offered by Cantonese BBQ restaurants. It usually includes egg, BBQ pork (or ham), chicken, shrimp, carrots and peas. This recipe is my own rendition. Since I use similar ingredients so I named it after the one you find in the restaurant. And this is the best way I use up the leftover rice that was left dried and got old in the fridge for several days :)
 Ingredients:
Cooked rice : 4 bowls
BBQ pork (叉燒肉): 5oz (can be replaced by ham, chicken, or pork)
Frozen package of carrots and peas : 1/2 cup
Frozen bamboo shoot: one piece
Dried mushrooms: 5 pieces
egg : 1
green scallion: 1
salt, pepper and light soy sauce for seasoning
Steps:
1. Cook the rice using a rice cooker (The rice cooker comes with a small cup. One small cup is equivalent to 3/4 measuring cup). Using 2 cup of raw rice will make 4 bowls of cooked rice. The freshly cooked rice is usually too sticky to make fried rice. You might want to use less water when you cook it. After it is done, open the rice cooker, mix the rice and let it cool for a while. But, if you happen to have some left over rice that is stored in the fridge overnight, and too dry to eat, use them will get you the best result.
2. Soften the dried mushrooms by submerging them in water for 1 hour or until they are soften.
3. Cut the bamboo shoots, mushrooms (take the stem out), and BBQ pork into small cubes (similar to the size of the carrots in the frozen package). Chop the scallion and beat the egg (add a pinch of salt in egg batter)
4. Heat up 1 tsp vegetable oil in the cooking pan, stir fry the egg batter and break it into small pieces, take the egg out of the pan.
5. In the same pan, heat up 1 TBSP vegetable oil, stir fry black mushrooms, bamboo shoots and frozen carrots and peas, add 1/2 tsp salt, 1/2 TBSP soy sauce for 2-3 minutes, then add the BBQ pork. If you use chicken or pork instead of BBQ pork (which is already cooked), you will need to marinate the meat and stir fry them until they are cooked first. Take the meat and vegetable out of the pan.
6. Heat 1/2 TBSP vegetable oil again, add the chopped scallion and wait until they are turning brown a little bit, add rice and stir fry them for 2-3 minutes. (If the rice is cold, fry them until they are heated) Add salt and pepper for seasoning (don't add too much because the meat and vegetable are already flavored). Add eggs (#4) and the rest of ingredients (#5) and mix well. Note if there is juice from the vegetables in #5, drain the juice before you put them back to the rice.
Last Note: it doesn't need to be precise about the portion of the ingredients. Many of the ingredients can be exchanged. For instance, the one I made yesterday had corns because I bought a mixed package with carrots, pea and corns. Sometimes, I put chopped fish balls or artificial crab meat. For meat, you can use sausage, chicken, pork, or ham. The key of success is that the rice should be loose and dry, not sticky or mushy. Try not to add any liquid (from the meat or vegetables) in the rice when you make the dish.
Winter Melon Soup (火腿冬瓜湯)
 This is a very traditional Hangzhou (杭州) soup. For simplicity reason, we are lumping it into the world of Shanghai Dish. #ShanghaiDish
- The flavor of the soup comes mainly from the Jinhua Ham (金華火腿, see product package to the right). Regular lunch ham from any market can be used as substitute. Cut the ham into thin slices. Also, Virginia Ham might work as well the Jinhua Ham (haven't tried yet). Note- The Jinhua ham comes in thick, hardened form, making it hard to cut. As a result, please cut with extra care!
- Fill a medium-sized pot (~8" in diameter) with water to 50% full. Place ~2 oz of sliced Jinhua Ham (or 6-8 oz of regular lunch ham), along with 6-8 oz of chicken broth. Bring the pot to boil and let simmer (with the lid on) for 15 minutes. Note- No need to add salt.
- Cut a large wedge of winter melon (~ 3-4 lbs) into ~2" wide slices, clean seeds out in each slice, and remove the skin of the melon from each slice (cutting the skin out vertically by laying the slice side way). Further cut each slice into ~1" wide x 1/2" deep x 2" thick pieces. Note- The melon slice is about 2" thick.
- Place the melon pieces in the pot. Bring the soup to boil, and let simmer (with the lid on) till the melon pieces are nearly transparent (looking like frosted glass), which takes another 15-20 minutes.
- Add 12-15 pieces Lima Beans or Broad Beans (蠶豆) into the soup after the melon has been cooked for ~10 minutes. Note- Both beans came in frozen form. Here is a finished product.

Friday, October 24, 2014
Cantonese-style double-side-pan-fried noodle with BBQ pork and vegetable (叉燒兩面黃)
So we made some Cantonese-style BBQ Pork in a previous post. Now we can make use of the pork to create a quick meal or two. #CantoneseDish
- Get a pack of steamed Chow Mein, i.e., steamed noodle (see product package to the right). Each 14-oz pack can be used to cook three meals (or 3 servings). Prepare the noodle per product package. For the package shown, blanch the noodle into boiling water for 10 seconds, take out, and drain water out with a strainer. Rinse the blanched noodle with cold water.

- Separate the noodle into 3 roughly equal portions. Place each portion in a flat plate, and forge the noodle into round disc shape (like a 1-1.5" thick pancake).
- (Fry the Noodle, Medium-to-High Heat) Heat 1/4" vegi-oil in a flat cooking pan (for 2-3 minutes). Place one portion of the noodle in the pan, and fry till the noodle is golden brown and brown (at least in part of the disc shape, for ~4-5 minutes). Flip the disc-shaped noodle, and fry again (use spatula in one hand and a pair of chopsticks in the other hand). Place the fried noodle on a large size plate. Note- use splatter guard or a lid while frying.
- (Prepare the Noodle Sauce, Phase 1- High Heat) While the noodle is being fried, heat 1-2 tsp of vegi-oil in a separate medium-to-large-size flat bottom cooking pan. Place the BBQ Pork (sliced) into the pan (If BBQ Pork is replaced with seafood or beef flank, we need to stir-fry for 2-3 minutes; see Step 6 below). Then place the following into the cooking pan and stir-fry for 2-3 minutes: your favorite leafy vegetable (rinsed and chopped), some bamboo shoots (in frozen package, sliced), some black fungus (in dried form, soak in water and cut into bite size), some dried mushroom (soak in water and cut into small chunks). Season with 1/2 tsp salt, 1 tsp soy sauce, and 1 Tbsp Oyster Sauce.
- (Prepare the Noodle Sauce, Phase 2- High Heat) Clear the center of the cooking pan (by push all the ingredients to the sidewalls of the pan), pour in 1/2 cup of water (for each serving), let cook till the water boils in the center of the pan. Pour corn starch water (1 Tbsp of corn starch mixed thoroughly with 3 Tbsp of water) into the center of the pan and stir quickly till the water turns thick. Turn off heat, bring all the ingredients into the thickened sauce, mix evenly, and pour the sauce on top of the fried noodle, and serve. Here is a finished product.

- This dish can be easily changed into a couple of other different, but equally authentic, Cantonese Noodle dishes. By replacing the BBQ pork in Step 4 above with fish filet, squid, and shrimp (all in bite size), we get a Seafood Noodle dish. If we use Beef Flank (sliced into bite size), instead of BBQ Pork, we'll have a nice Beef Noodle dish. Note- BBQ Pork is fully cooked, but seafood and beef flank need to be stir-fried for 2-3 minutes before adding in other ingredients.
Cantonese-style BBQ Pork (廣式叉燒)
This is a traditional Cantonese-style dish that's been around forever. We can definitely buy this kind of BBQ Pork. But doing it yourself has its value, esp. for those who cannot easily find the ready-made item. The recipe below is still work-in-progress in the area of making the pork look red in its color. Please continue to monitor future revisions in this area.
- Get ~1 lb of pork butt (with some fat) or pork tender loin (with no fat). For pork butt, Chinese markets tend to sell a big chunk of 3-4 lbs, just adjust the seasoning proportionately. Cut the meat into slices (2 - 2"5" thick slice for pork butt).

- (Marinate the meat overnight) Mix 2 Tbsp Red Wine, 1 Tbsp Sugar, 1 tsp salt, and 2 Tbsp Lee Kum Kee (李錦記) Char Siu Sauce (叉燒醬, see product package to the right) thoroughly, and pour the mixed sauce into a clean 1-gallon double-zip bag. Place the meat in, zip the bag tightly. Mix the sauce and the meat together inside the bag. Place in fridge over night, preferably for 24 hours. Note- Char Siu Sauce (叉燒醬) is the ingredient that makes the meat red, because it contains food color. I plan to try Ketchup or Anka Sauce (see this post for more info) in place of the Char Siu Sauce in the future, and revise this part of the recipe accordingly.
- (Baking Phase 1) Preheat oven to 400-deg F. Place the meat slices with all the marinate sauce in a glass baking pan (at least 1.5" deep). Cover the pan with tin foil or another flat cookie pan. Place the covered glass pan into oven, and bake for 50 minutes. Note- Meat slices will be dry if not covered tightly.
- (Baking Phase 2) Reduce heat down to 300-deg F. Drain out the sauce left in the deep glass pan. Brush on a thin layer of honey and place the glass pan back in the oven without the cover for 10 minutes. Brush honey again and bake for another 10 minutes. Flip the meat slices and repeat the brush and bake process. Note- Total baking time for this phase is 40 minutes, i.e., (10 minutes x 2) for each side x 2 sides.
- Let the meat cool down and use it with other dishes (see this post). Here is a finished product. Note- this version looks darker red, because I used soy sauce, instead of salt, brown sugar, instead of sugar (both darken the sauce, and the meat, considerably). Will do better next time.
Thursday, October 23, 2014
Shanghai-style Smoked Fish (燻魚)
This is another traditional Shanghai-style dish. Even though the name says "smoked" dish, it only tastes like it. There is no need to place the fish in a smoke chamber or anything like that.
- Get ~1 lb of Grass Carp steak (preferably the cut from 1/3 of the fish from the tail-end to 1/6 of the fish from the tail-end, so the pieces are in oval shape, as shown in the picture here). Note- Might be useful to consider cutting the steak further into 1/2"-thick slices yourself, or just buy pre-sliced oval pieces. The markets I go to can't seem to cut the steak into thinner than 1" slices, for lack of proper tools. If you choose to do this, you need a sharp knife (to slice through the meat) and a cross-cutting tool, such as a steel-wire cutter from Home Depot (to cut through the bones). Cutting through the bone with a knife won't work since heavy pounding will surely crush the flesh on the underside.
- (Marinate the fish steak) Mix 2 Tbsp Rice Cooking Wine, 2 Tbsp Soy Sauce, 1 stalk of green onion (chopped into 2" segments), 3-4 slices of ginger. Add fish steak pieces into the mix, and let sit at least 2 hours (preferably overnight).
- (Prepare the Soaking Sauce, used for soaking the steak after frying) Mix 1 tsp Five-Spices, 2 Tbsp Soy Sauce, 2 Tbsp Rice Cooking Wine, 3 Tbsp Brown Sugar, 1 Tbsp of Dark Vinegar, 1/2 cup water in a 6-8" flat-bottom pan, bring to boil, cover the lid, and let simmer for 2-3 minutes.
- Take the marinated fish steak pieces out, drain all liquid, and wipe gently with paper towel.
- (Medium-to-Low Heat Fry) Heat 1/4" vegi-oil in a 8-10" flat-bottom pan for 3 minutes. Place steak pieces in the pan, cook till the surface is lightly golden (for ~2-3 minutes each side). Take out the pieces and let sit for 5-10 minutes to cool down.
- (Medium-to-High Heat Fry) Heat the oil again for 2-3 minutes. Place fish pieces in the pan again, cook till the surface is golden brown or a bit darker (for ~4-5 minutes each side). Note- Cover the lid or use a splatter screen.
- Take out the fish pieces, drain oil with a strainer, then place the pieces in the Soaking Sauce prepared in Step 3 above. Let soak for 30-60 minutes each side, and serve. Here is a finished product.


Ma-Po Tofu (麻婆豆腐)
 This is a traditional Szechuan dish, which is spicy and tasty.
- (Low Heat) Heat 1 Tbsp of Hot Chili Pepper Oil (辣油/紅油, see Part III of this post), add 1/4 lb of ground pork, press down flatly with a spatula, then stir (to make sure the pork particles are no longer bunched together).
- Add minced green onion (1 stalk), ginger (3-4 slices, minced), garlic (2-3 cloves, minced), 1/2 tsp salt, 1 tsp soy sauce, and stir for 2-3 minutes.
- (High Heat) Add a pack of soft tofu (diced into 1/2 - 1" cubes), 1 Tbsp of Hot Bean Sauce (see product package to the right), and 1/4 cup of water, into the cooking pan, stir gently and cook for 2-3 minutes. Season to taste (add 1/4 tsp salt a time).
- Turn off heat, sprinkle 1 Tbsp of Hot Chili Pepper Oil on top (辣油/紅油, more if you like it really spicy hot), and 1 - 2 tsp of Sichuan Pepper powder (花椒粉). Garnish with minced green onion and serve. Here is a finished product.

Saturday, October 18, 2014
Shanghai-style Rolls wrapped in Soy Sheet (薺菜百頁包)
One more authentic Shanghai dish.
Fillings- 薺菜 and ground pork
Wrap with Soy Sheet
Cook with chicken broth and leafy vegetables
- Get a pack of Soy Sheet (see left-side picture below for product package; this is thicker-type sheet, not the paper-thin type used in this earlier post). Defrost the sheets.
- Get a pack of Frozen Chinese Spinach (薺菜, see right-side picture for product package). Defrost, rinse thoroughly (no need to blanch), cut off all the roots with a pair of scissors, mince, and hand-squeeze out any water left in the minced Chinese Spinach.

- (Make the filling) Marinate one pound of ground pork with 1 Tbsp Rice Wine, 2 tsp corn starch, for 30 minutes. Add in minced Chinese Spinach (from Step 2), 3-4 stalks of green onion (minced), 2 tsp salt, 2 tsp white pepper, 1 tsp sugar, 2 Tbsp Sessame Oil. Mix thoroughly. Note- Pan-fry a small patty of the mix to decide if the mix needs more seasoning according to your preference.
- Cut each soy sheet diagonally into two large triangles. Place the filling along the long side of the triangle, roll the soy sheet up tightly while folding in both sides (see Step 5 in the Chicken Wrap post for a picture).
- Place rolls side by side in a plate, and steam in a rice cooker or a steamer pot for 15 minutes (i.e., 15 minutes after full steam is built up inside the steamer).
- Garnish with blanched leafy vegetable and serve (see finished product below). Or serve as part of the soup in Part B of this post.

Fillings- 薺菜 and ground pork
Wrap with Soy Sheet
Cook with chicken broth and leafy vegetables
Wednesday, October 15, 2014
Three simple dishes with bean vermicelli (粉絲三吃)
Bean vermicelli (粉絲), also known as Chinese vermicelli, or mung bean starch noodle (bean noodle), can be used to cook some simple but tasty dishes. The first dish below is a well-known spicy Szechuan dish, the second a Shanghai-style soup, the third a simple vegetarian dish. #SzechuanDish #ShanghaiDish, #VegetarianDish
I. A Famous Szechuan Dish (螞蟻上樹, Ground Pork and Bean Vermicelli)
I. A Famous Szechuan Dish (螞蟻上樹, Ground Pork and Bean Vermicelli)
- Soak 1/3 lb (~150g) of bean vermicelli in cold water till turning soft (10-15 minutes). See the left-side picture below for product package (use 1/3 of the bag, ~1/3 lb). Note 1- The Pagoda Brand (塔牌) shown here seems to work pretty well. It is important for the bean vermicelli NOT to disintegrate into smaller pieces after 2-3 minutes of cooking.

- (Low-to-Medium Heat) Heat 1 Tbsp of hot chili pepper oil (get it from any Chinese market, or follow the recipe in Part III of this previous post, Some Useful Sauces and Dips) into a flat bottom cooking pot. Add 1/4 lb of ground pork (not marinated) into the pot, slowly stir-fry the pork for 3-4 minutes (make sure the pork does not form lumps).
- (Medium Heat) Push the ground pork to the side, to form a well in the middle of the pot. Add minced dry shrimp (4-6 dry shrimps, 蝦米, soaked in warm water for 30 minutes first) and minced garlic (1-2 cloves) into the well. Stir the newly added ingredients till fragrant.
- Add 1 Tbsp of Hot Bean Sauce (see right-side picture above for product package), 1 Tbsp Soy Sauce, 1 tsp Sugar, 1.5 cups Water, into the well. Bring the soupy sauce to boil.
- Add bean vermicelli into the boiling sauce, stir and mix thoroughly for 2-3 minutes (with a spatula in one hand and a pair of chopsticks in the other hand). Note 2- By now the bean noodle should have absorbed a large percentage of the water from the sauce. Add 1/2 cup of water and stir, if water is completely absorbed. Taste to make sure the bean vermicelli is moist.
- Turn off heat. Sprinkle sesame oil and stir, garnish with chopped scallion or cilantro, and serve. Here is a picture of the finished product.

- Follow Step 1 in Part I above to prepare 1/6 lb of bean vermicelli.

- Cut each piece of Fried Bean Curd Puff, aka Fried Soy Bean Cake, diagonally (each comes as a square, use 5-6 squares, see product package to the right).
- (Low-to-Medium-Heat) Heat 2 tsp vegi-oil, add mined green onion (1 tsp) and ginger (1 tsp), 1/2 tsp salt, stir-fry for 1-2 minutes. Add 2 cups water and 2 cups of chicken broth.
- Add Fried Bean Curd Puffs into the soup, bring to boil, then simmer for 10-15 minutes.
- Chop 2-3 rolls of Soy Sheet Wrap (薺菜百頁包) into 1" segments and add into the soup (Soy Sheet Wrap- to be pasted later). Add some chopped leafy vegetables of your choice, if desired
- Add bean vermicelli into the soup and simmer for 2-3 minutes. Replenish the water absorbed by bean vermicelli (~1 cup). Season to taste (add 1/4 tsp salt a time).

III. Napa Cabbage with Bean Vermicelli (大白菜粉絲)
- Follow Step 1 in Part I above to prepare 1/3 lb of bean vermicelli. Soak 10-12 dry shrimp (蝦米) in warm water for 10-15 minutes (optional).
- Chop half a small Napa Cabbage (or 1/4 of a large one) into bite size (~1.5"-square)...
- (High Heat) Heat 1 Tbsp vegi-oil, 1/2 tsp salt, add chopped Napa Cabbage and stir-fry till the pieces are still crunchy but no longer raw. Add the soaked dry shrimps, and some chopped Simulated Crab Meat before adding Napa Cabbage, if desired.
- Add 1 cup of chicken broth and 1/2 cup of water. Bring to boil.
- Add Bean Vermicelli in, mix evenly with Napa Cabbage, and cook for 2-3 minutes. Add water if the watery sauce is completely absorbed by Bean Noodle. Season to taste (add 1/4 tsp salt a time), and serve.
Tuesday, October 14, 2014
Shanghai-style Pork Hock (冰糖元蹄 or 走油蹄膀)
Here is another authentic Shanghai-style pork dish, one of my favorites. Don't get thwarted by the efforts. The result makes the efforts quite worthwhile.
- Get a small-size boneless pork hock (with skin, ~2 lbs; or use one piece of the boneless, skinless Pork Shoulder in large pack available from Costco). Clean thoroughly. Singe out any remaining hair on the skin using a stove lighter or a small blow torch (hold the meat side firmly with one hand, while singing out the hair on skin using the other hand!).
- Blanch the meat for 2-3 minutes.
- (Low Heat) Heat 1 Tbsp vegi-oil in a large-size (10-12" in diameter) flat bottom cooking pan, and place 2 Tbsp of rock sugar in (or 2 Tbsp of brown sugar, or 1Tbsp of Rock Sugar plus 1 Tbsp of brown sugar). Note- Rock sugar is cane sugar in rock form. Might be useful to pick the kind of package with smaller pebble-sized rocks, so you don't have to hammer the larger pieces into smaller, more manageable, pebbles.
- (Low Heat) Place the meat skin-side-down into the pan after the rock sugar dissolves partially (or brown sugar dissolves completely). Move the meat around regularly to let the skin aquire color from the sugar, till the skin is in golden brown color (5-6 minutes).
- Add enough water to immerse the meat above halfway point, add 2-3 stalks of green onion (chopped into 2" segments), 4-6 thin slices of ginger, 2 Tbsp Rice Wine, 3 Tbsp Soy Sauce, 1 tsp salt, and 2-3 star anise (optional).
- Bring to boil and then let simmer (with lid on) for 1 hour with skin-side down, and for another half hour with meat-side down (use a spatula in one hand and a pair of chopsticks in the other hand to flip the meat). Monitor the water level after an hour, and add water to keep the meat half-way immersed. Shift the meat piece slightly in the pan every 30 minutes to make sure it is not stuck to the bottom of the pan. Now, flip the meat again to skin side down again. Note- Meat is considered ready when you can easily and smoothly poke a single chopstick through the piece.
- After 1.5 hours, do one of the following two things: (1) take off the lid and turn on high heat, to reduce the sauce to thicker form, for 10-15 minutes; or (2) turn off heat, without reducing the fluid to thicker form (but ladle more sauce on top when serving).
- Garnish with blanched leafy vegetable (of your choice, e.g., spinach), ladle some of the sauce left in the cooking pot on top of the meat skin, and serve. Alternatively, chill the meat in fridge overnight, then serve in thin slices with soy paste (醤油膏) sprinkled on top, or on the side as dipping sauce. Here is the outcome from our kitchen.

Monday, October 13, 2014
Taiwan-style Minced Pork Sauce (台式香菇肉燥,肉燥米台目)
This is quite a versatile Taiwan-style sauce that is often used to whip up a quick meal by mixing it with rice (肉燥飯), noodle (肉燥麵), or Taiwan-style rice pasta (肉燥米台目, see product package below). It is easy to make. It will keep in the fridge for 2-3 weeks , or in the freezer for 2-3 months. It is worth noting that this sauce is similar to the pork stew we posted earlier, except that this item takes much less time to cook, and uses ground pork instead of large chunk of pork. #TaiwanDish
I. Taiwan-style Minced Pork Sauce (台式香菇肉燥)

I. Taiwan-style Minced Pork Sauce (台式香菇肉燥)
- Marinate 1-lb of ground pork with 2 tsp rice wine, 2 tsp soy sauce, 2 tsp corn starch, stir evenly, and let sit for 30 minutes. Note 1- Instead of using ready-made ground pork, consider grinding leaner meat, such as pork butt, into ground pork.
- Soak 6-8 pieces of dry mushroom in hot water till they are soft (30-60 minutes). Then chop into small chunks (~1/4"-square size).
- Mince 3-4 cloves of garlic.
- (Medium-to-High Heat) Heat 2 Tbsp of vegetable oil in a flat-bottom cooking pan, stir-fry garlic and mushroom for 2-3 minutes, then add marinated ground pork, and stir-fry for another 2-3 minutes.
- (Medium-to-Low Heat) Add 3-4 cups of water, add 1 cup of Fried Shallots (油蔥酥, see product package in Pork Stew post). Season with 1/2 tsp salt, 1 tsp sugar, 1 tsp white pepper, 2-3 Tbsp Rice Wine, 2-3 Tbsp Soy Sauce. Let simmer for 8-10 minutes with lid on (stir every 2 - 3 minutes). Add water to keep the sauce in fluid paste form.
- Season to taste (add 1/4 tsp salt and/or 1 tsp soy sauce a time). The picture below shows Taiwan-style Rice Pasta (肉燥米台目), a dish we've grown to enjoy so much over time.

- Defrost 2 small packs of frozen rice pasta by unpacking and immersing in water till noodles are soft (15-20 minutes; There are 5 packs in a package, see the picture above for product image). Strain water out from rice pasta. Note- Use frozen Udon (the Japanese thick noodle) instead, if rice pasta cannot be found in the local market.
- Heat 4 Tbsp of vegetable oil at High Heat for 1 minute, in a flat bottom cooking pot. Place rice pasta in the pot. Use a pair of chopsticks to stir the pasta in the oil, to make sure the noodles are not bunched together, and the veggie oil soaks through. Cook till the pasta is soft and slightly golden (3-4 minutes). Note- Add some water and 4-5 extra minutes of cooking, if Udon is used instead of rice pasta.
- Add 1 - 2 cups of Minced Pork Sauce (肉燥) into the pot, and mix evenly, stir-fry for 2-3 minutes.
- Still on high heat, add 2-3 cups of mung bean sprouts (綠豆芽) and stir-fry for 1-2 minutes. Add 1-2 Tbsp of soy sauce to taste, and to add color.
- Now add 2-3 cups of chive (韭菜, chopped into ~1" segments), mix and stir for 15-30 seconds Turn off heat. Mix all the ingredients evenly and serve.
Saturday, October 11, 2014
Two More Taiwan-Style Snacks (台灣小吃 龍鳳腿 台南蝦卷)
Here are two more Taiwan-style snacks:
I. Taiwan-style Dragon and Phoenix Leg (台灣小吃 龍鳳腿)
I. Taiwan-style Dragon and Phoenix Leg (台灣小吃 龍鳳腿)
- Mince ¼ cabbage, mix in 1 tsp salt, wait 2-3 minutes, hand-squeeze water out.
- Mince 5 more vegetables: Onion, Celery, Cilantro stem (optional), Carrot (use slicer), Water Chestnut. Note 1- See Chicken Roll for more details. The difference here is the need to chop into finer pieces, i.e., smaller than 1/4"-square pieces.
- Slice 1/4 of a lettuce (into 1/4-1/2" slices) and spread into the bottom of a large flat plate (use as garnish).
- Marinate 1/4 lb Ground pork with 1 tsp of rice wine, 1 tsp of corn starch, 1 tsp of soy sauce, 1/2 tsp salt, 1/4 tsp of minced ginger in a larger bowl for at least 20 minutes.
- Add 3/4 lb of Fish Paste and all the minced vegetables from Step 2 into the mixing bowl. Season with 1/2 tsp five-spices, 1 tsp sugar, 2 tsp white pepper, 2 tsp sesame oil, and 1 Tbsp of Sweet Potato Powder. Stir into thick-paste form. Note- Gradually add 1 Tbsp of Sweet Potato Powder a time and stir, until the mixture is thick enough (no longer watery), esp. for the fish paste that is frozen, defrosted, and drained of water (but still watery).
- Wrap the paste from Step 5 into chicken drumstick form, with Caul Fat (豬網油, spread Caul Fat to 3-4”-wide strips). Place a bamboo stick in the middle, and roll up (cut the net-like Caul Fat with knife, patch as needed). Spread all purpose flour evenly outside the wrap. Place the wrapped rolls in a "stand-up" posture in a mid-sized bowl, with thicker-end down and bamboo-stick leaning on the edge of the bowl. Note 2- Instead of using Caul Fat (the traditional, authentic wrap), we can also use To-Fu-Skin as we did for the Chicken Roll (wipe the to-fu-skin with damp kitchen towel to soften, before wrapping).
- Pan-Fry the rolls with 1/2" of Vegi-Oil in a flat pan, using the following sequence: (1) ~3 minutes each side in Medium-to-Low Heat, i.e., 3 mins x 2 sides; (2) ~1 min each side in Medium-to-High Heat, until the the skin is golden brown and the Caul Fat is no longer visible (By now, all fat would be now in the pan, no longer on the roll.)
- Prepare dip- Use Chili Sauce, i.e., a sweet & spicy sauce (甜辣醬) or its substitute (2 tsp soy sauce, 2 tsp of any hot and spicy chili pepper sauce, 2 Tbsp Ketchup) as dip (see more info in Step 7 of the Chicken Roll post). In the left picture below the 3 large chicken-drumsticks-shaped items are the finished products, although the drumsticks should be smaller ("These look like Turkey Drumsticks!", as my adult supervisor and the boss at home said :-).
- Get 1/2 lb of peeled and devened shrimp from any Chinese market (clean, and chop each into 2-3 chunks). Note 1- Larger chunks of shrimp make the name for this item. Marinate 1 lb of shrimps for 2-3 hours with 1 Tbsp of rice cooking wine, 1 Tbsp of corn starch, 1/4 tsp of baking soda, and 1 Tbsp of veggie oil, as we did in Sautéd Crystal Shrimps.
- Mix in 1/2 cup of sliced carrot and 12-15 chopped water chestnuts. Prepare lettuce as Step 3 above.
- Mix in 1/2 lb of fish paste, season with 1/4 tsp of minced ginger, 1/2 tsp salt, 1/2 tsp sugar, 1 tsp white pepper, 1 Tbsp of rice wine, and 2 tsp sesame oil. Stir into thick-paste form. Lastly, add 1/4 cup of Yellow Leek or Yellow Chive (韭黄, clean and chop into 1.5-2" segments) and some chopped cilantro (optional), and stir again. Note 2- Don't add yellow leek too early, as it will dispense water into the paste. If the fish paste has been frozen and then defrosted, it must be drained of water completely (might consider using fresh fish paste to make this item).

- Wrap the paste with caul fat (see left picture above), or in to-fu-skin (see right picture above), into spring-roll (春捲) shape.
- Pan-fry in a flat pan with 1/2" vegi-oil in the following sequence: 2-3 minutes each side in medium-to-low heat (i.e., 2-3 minutes x 2 sides), ~1 minute each side in medium-to-high heat until golden brown. The 6 smaller spring-rolls-like items around the plate in the left picture are the finished products wrapped in Caul Fat. The right picture shows shrimp rolls wrapped in To-Fu-Skin. .

Wednesday, October 8, 2014
Sesame-Paste Biscuit (芝麻醬燒餅)
Here is a flour-based biscuit perfect for making a special kind of sandwich with stewed beef (widely known as 牛肉燒餅), or for breakfast. The method used here is similar to the Sesame Pancake posted earlier. Instead of making larger-sized pancakes (8-10" in diameter), we are making smaller biscuits (~3" in diameter). Instead of vegetable oil and scallion, we use sesame paste inside.
- Make the dough: Add 1.75 tsp of regular yeast (not Rapid Rise Yeast), 1 tsp of sugar, into 1 cup of warm water (<88-deg-F). Let it sit for 5 minutes, and then pour into 4 cups of all purpose flour. Add another 3/4 cup of warm water into the flour. Use a mixer or knead with hand (see more info in this earlier post). Let the dough rise until it's doubled in its size. Note 1- Add 0.75 tsp of yeast if the yeast is old (e.g., on the shelf for over 2-3 years).
- Prepare the sesame paste: Sesame paste can be found in any Chinese market (see product package to the right), or made at home from scratch (see our recipe at the bottom of this post). As the paste sets to the bottom of the bottle on the shelf, we must first mix the paste evenly before use. Take 3 Tbsp of mixture from the bottle, add 2 tsp of sesame oil, 2 tsp of Chinese Pepper (胡椒粉), and 1 tsp of salt, and stir to create a even mix.

- Cut the dough into 8 even parts. Place one pare on a kneading board (or any clean flat surface), hand-press the part into a larger oval shape (see left picture above), then roll the oval into an elongated sheet (see middle picture above), Spread sesame paste evenly on the sheet with a spoon (see right picture above). Note 2- The sheet is stuck to the board at the point. But there is no need to worry!

- Start to roll the sheet up with both hands using 3 concurrent motions: (1) roll the sheet from the bottom up, (2) pull the sheet up slightly and back toward yourself (scrape the sheet off of the board with both thumbs), (3) pull the roll to the left and to the right (with both hands). Note 3- The sheet is very elastic by its nature.The left picture above is the sheet half rolled-up. Middle picture shows a long roll from the sheet, after being stretched by the three concurrent motions.
- Cut the long roll into half. Build the roll into a spiral (~2" in diameter, see upper half of the right picture above). Hand-press the spiral from the top down, to form a biscuit (2.5"-3" in diameter, see bottom half of the right picture above).

- Brush egg fluid on the top surface of the biscuit, and press the top surface into a rice bowl with raw white sesame seeds at its bottom. See 12 biscuits ready to bake in the picture.
- Preheat the oven to 360-def-F, and bake the biscuits for 16 minutes. See left picture below for finished product. Note 4- Baking makes the top surface popping up (looks like a scone now?).
- Alternatively, we can also pan-fry the biscuits under low heat. First, spread a thin layer of vegetable oil in a flat pan (enough oil to coat the pan surface), place the biscuits in by placing the top surface (with sesame seeds) down initially. Close the lid (to prevent the moisture from escaping), and cook for ~5 minutes (check to make sure the sesame seeds are not burnt). Flip the biscuits and cook (with the lid on) for another 4-5 minutes. See middle picture below for finished product. Note 5- This version is flat on both sides (in better shape :-). Note 6- The rightmost picture below shows two stewed-beef sandwiches (牛肉燒餅). Simply follow Part A of this recipe to make your own stewed beef.


Sunday, October 5, 2014
Two Popular Snacks (台灣小吃 鹽酥雞, 廣式 椒鹽雞翼)
Here are two popular snacks we can all prepare at home: (#TaiwanDish, #CantoneseDish)
I. Taiwan-style Popcorn Chicken, 鹽酥雞 (台灣小吃)
I. Taiwan-style Popcorn Chicken, 鹽酥雞 (台灣小吃)
- Get ~1 pound of boneless, skinless chicken breast (or thigh); clean thoroughly, and cut into roughly 1" x 1" x 1/2" pieces..
- Marinate the chicken pieces for 30 minutes, with 1 Tsp corn starch, 1 Tbsp Rice Wine, 1 Tbsp Light Soy Sauce, 1/2 tsp salt, 1 tsp Five-Spices (五香粉), 2 tsp white pepper, and 1 egg (Mix sauce and spices in a bowl before putting in the chicken pieces).
- Spread Sweet Potato Powder (地瓜粉, preferably coarse-grained powder, 粗地瓜粉, but fine-grained powder, 細地瓜粉, works as well; see product package) in a flat plate. Roll the chicken pieces in the powder and set aside all the powdered pieces in a clean plate for a minute or two.
- (Medium-to-High Heat) Deep-fry chicken pieces with vegetable oil (or pan-fry with half of the pieces immersed in vegetable oil) at medium-to-high heat till both sides are golden brown (i.e., at most 5 minutes; Flip the pieces after ~2.-3 minutes). The ideal color should be like the picture by Chicken Wings Step 1. Note 1- Try not to over-cook! Chicken "tender" should be tender inside, yet crispy outside. Please consider turning OFF heat after 4 minutes, and using the residual heat to cook for a minute or two.
- Garnish with slightly-fried fresh basil leaves and serve. (Rinse basil leaves, place leaves in a strainer, and dip the strainer with leaves into hot oil for ~5 seconds). Here is a picture of the finished product.


- Get ~1 pound of chicken wings (get a pack with only the "mid-joint-up" pieces, see picture below); clean thoroughly.

- Marinate the chicken wings for 30 minutes, with 1 Tsp corn starch, 1 Tbsp Rice Wine, 1 Tbsp Light Soy Sauce, 1/2 tsp salt, 1 tsp Five-Spices (五香粉).
- (Low-to-Medium Heat) Deep-fry the wings (or pan-fry with half of the wing immersed in vegetable oil) at low heat for 5-6 minutes (2-3 minutes each side). Take out and set aside for 3-5 minutes. Note 2- Consider turning OFF heat after 5 minutes, and using the residual heat to cook for a minute or two.
- (Medium-to-High Heat) Deep-fry (or pan-fry) the wings again at high heat till the wings are golden brown, i.e., for 5-6 minutes (2-3 minutes each side, see picture to the right for the ideal color). Note 3- Try not to over-cook! Consider turning OFF heat after 5 minutes, and using the residual heat to cook for another minute or two.
- Prepare a mix of 1/2 tsp salt, 2 tsp black pepper, and 1 tsp Chinese Pepper (花椒粉), and set the mix on the side of the wings (as dip); Garnish with chopped and dry-stir-fried fresh chili peppers (either red or green or both, chop and stir-fry without oil for 15-20 seconds), and serve. Here is a picture of the finished product. Note 4- Chinese-style salt-and-pepper (椒鹽) : (1) dry stir-fry (w/o oil) 1 Tbsp of Chinese Pepper (胡椒粉) with 1/2 Tbsp of salt at low-to-medium heat, till the salt turns sandy color (i.e., having absorbed the taste of Chinese Pepper); (2) Filter out Chinese pepper with a strainer, and then add 1 Tbsp of black pepper.

Subscribe to:
Posts (Atom)