Friday, November 18, 2016

Pumpkin Soup (南瓜濃湯)

It is fall and time for pumpkin harvest.  My mom used to cook pumpkins when I was small and I loved its sweetness and its texture.  In my first Halloween in US, I tried to cook the big orange American pumpkin in the way my mom did,  I was disappointed because its taste was totally different from what I remembered.  In recent years,  the Chinese markets in LA have the green and smaller Japanese pumpkins (see picture below) on sale and they do have the same sweetness and texture as the ones I had in Taiwan.  According to Wikipedia, it's called "Kabocha" in North America and it has the following description which I think is quite accurate:  "It is similar in texture and flavor to a pumpkin and sweet potato combined."

Last week, I tried to make the creamy pumpkin soup for the first time. After reviewing a few online recipes, I decided to use a simple recipe from Allrecipes.com (http://allrecipes.com/recipe/9191/pumpkin-soup/) with some changes based on my own preference. The result was quite satisfactory so I made it again today in order to get accurate measurements to write the recipe.

Ingredients:

1 small Japanese pumpkin (about 3 cups of pumpkin cubes)
1 small onion
3 cloves of garlic
1 can of chicken broth
1 cup of half and half
2 Tbsp sugar, 3/4 tsp salt for seasoning
1 cup of water

Steps:

1. Remove the pumpkin seeds, skin and cut it into inch-size cubes.  Note-  Kabocha's skin is very very hard and very difficult to cut when it is raw. I learned a trick to make the task easy from a Taiwanese celebrity chef. First boil water in a large pot that is big enough to submerge the pumpkin entirely in the water. After the water is boiling, turn off heat, and put the pumpkin into the water and close the lid for 5 minutes.  Flip the pumpkin and let it sit in the hot water for another 5 minutes. By now the skin should be soft enough to be poked through with a fork without much force. Take the pumpkin out from the hot water, let it cool for a while, then remove the seeds, slice, remove the skin from each slice, and then cut into cubes.

2. Steam the pumpkin cubes in a Rice Cooker for about 30 minutes (I put 1.5 cup of water in the rice cooker and let the rice cooker go through its Cook/Warm cycles). The pumpkin should be very soft when it is done.

3. chop the onion finely and mince the garlic cloves. In a sauce pan, heat 1 Tbsp of vegetable oil, then sauté onion and garlic until they turn light brown.

4. Puree three cups of pumpkin, along with the sautéd onion and garlic, and one cup of chicken broth, using a blender or a food processor.

5. Put the puree into a pot, bring it to boil in medium-to-low heat. Add 2 Tbsp of sugar and 3/4 tsp salt for seasoning. Add one cup of Half-n-Half.  Add more water until the desired thickness is reached. (I added another cup of water).  Simmer for another 5 minutes and the soup is ready.


Tuesday, November 15, 2016

Moussaka from Lebanon (地中海茄子)

Over the weekend we went to Old Town Monrovia, to see Arrival, an interesting Sci-Fi movie.  After the movie, we strolled into a new Mediterranean restaurant nearby, and fell in love with this vegetarian appetizer, Mousakah (how it's named on the menu).  It's served as a cold dish, along with warm pita bread.  As it turns out, what we had in the restaurant was a streamlined version of the dish known as Moussaka from Lebanon (how it's named online), vs the Greek Moussaka, an eggplant casserole dish.  We tried to recreate the restaurant version of this dish and patterned our recipe below after two online recipes (1 and 2), but we left out the chick peas and oven baking.  We also followed the restaurant owner's suggestion of using vegetable oil, in place of olive oil.  The result is quite satisfying!  BTW, it's easy and quick to make this dish.
  1. [Prepare the ingredients] Rinse and cut 3 Chinese Eggplants (or 1.5 regular eggplant) into ~1/2" cubes.  Slice 6-8 cloves of garlic.  Slice 1 large (or 2 smaller) onions (1/2"- 1" long slices).  Cut 1 green bell pepper (or half a green and half a red bell pepper) into ~1" long slices. Dice 1-2 tomatoes (into 1/2" cubes).  Note- Regular eggplant might take longer to cook.  
  2. Add 1-2 Tbsp of veggie oil into a saute pan, add 1/4 tsp salt, turn on medium-to-high heat, pour in the eggplant cubes, stir, mix, and cook till it's almost soft (4-5 minutes). Take the eggplant cubes out and set aside.  Note- As the main ingredient for this dish, eggplant's texture is the key to this dish's success. Don't overcook eggplant at this point (if not sure, under-cook it).  If under time pressure, conduct this step at the end of Step 3.
  3. Add 1-2 Tbsp of veggie oil into the same saute pan, turn on medium-to-high heat, add the garlic and stir till fragrant.  Add the onion and stir till almost translucent (2-3 minutes).  
  4. Add bell pepper and cook for another 2-3 minutes. Add tomatoes.  Now, season with 1/2 tsp salt, 1/4 tsp black pepper, 1/2 tsp of paprika, and 2 Tbsp of tomato paste.  Stir and mix evenly.
  5. Add the almost-cooked eggplant into the pan.  Add 1/2 cup of water.  Stir and cook till the eggplant cubes are soft, but not mushy (2-3 minutes for Chinese Eggplant, maybe longer for regular eggplant).  Turn off heat, season to taste with salt, pepper, and paprika. 
  6. Chill and serve as a cold dish, with warm pita bread.  See picture below for the outcome in our kitchen.

Tuesday, September 20, 2016

Chive Pocket (韮菜盒子)

This is another delicious treat as part of the Northern Chinese Cuisine.  We used to make it regularly when our kids were younger.  And then we found an excellent source for frozen Chive Pocket that is as good, if not better, than the homemade version.  Recently we came across an occasion that made it necessary to make it at home again, actually at a home away from home that is too far to bring frozen food over.

Ingredients for filling:

Chinese chives    1 big bundle (~1 lb, i.e., 16 oz)
bean curds           1 package (4 pieces)
bean vermicelli    3 small rolls (or 1/3 of a 16 oz package)
eggs                     8
black wood ears   a handful  (6-8 small pieces, optional)

I. Preparing the Chive Filling
  1. Wash chives thoroughly, cut off 1/4 inches of the white part at the top.  Then chop them into small pieces.
  2. Chop the bean curds by first slicing one square horizontally into 4 or 5 slices, then cut them into strips in one direction and into bits in the other direction (~1/4"or smaller cubes).
  3. Beat the eggs, add 1/2 tsp salt, then scramble them.  Chopped the scramble eggs into small pieces.  The piece doesn't need to be as fine as bean curbs or chives (1/4"squares).
  4. Soak wood ears for 20 minutes, then chopped them into small pieces.
  5. Soak bean vermicelli in cold water till turning soft (10-15 minutes).  Drain the water, then submerge the wood ears in hot water for a minute or so (the water from a thermo, ~195 deg-F, works fine).  Take them out and cut them into 1/4 inch squares.  Note 1- See the right-side picture for product package (use 1/3 of the bag, ~1/3 lb).  The Pagoda Brand (塔牌) shown here seems to work pretty well. 
  6. Mix all the ingredients in a big bowl,  Season it with 1/2 tsp salt, 1/2 tsp black pepper, 2 Tbsp soy sauce, 3 Tbsp sesame oil (see picture below).

II. Preparing the dough and the flour skin 

This part is almost identical to Part II of this previous post, Beef Xian Bing (牛肉餡餅), with the exception that we do not use veggie oil to make the dough.
  1. Place 4 cups of all purpose flour in a large mixing bowl.  Stir in 1.25 cups of hot water (~200-deg-F, hissing but not boiling yet) with a pair of chopsticks, then stir in 0.25-0.5 cup of room temperature water gradually.  While adding water gradually, stir the flour mix with a pair of chopsticks until the flour is mostly bunched together (this is when we stop adding more water).  Knead the dough in the mixing bowl till its surface is smooth.  Cover the dough with plastic wrap, and let sit for 30 minutes.  
  2. Place the dough on a flour-dusted kneading board, cut the dough in half.  Work on one half of the dough first, by cutting it into 10 roughly even parts (doses).  Each part needs to be rolled into a round-shaped skin that is ~6" in diameter.  Note- We need thicker skin to make the chive pocket, thicker than what's used for Beef Xian Bing.  Here is a method of rolling a dough part into a round shaped skin. If we roll the rolling-pin along the edge of the skin with one hand in an up-and-down motion, while turning the dose in counter-clockwise motion with the other hand handling the dough part with the thumb on top and the other 4 fingers underneath, we can roll the dose into a round in 15-20 seconds.  It takes some practice, but quite doable.  This method results in a skin that is thicker in the center.  For Chive Pocket roll the rolling-pin from the center out 3-4 times along different directions to flatten the center.
III. Wrapping the filling inside the skin

  1. Set a piece of flour skin flat on the kneading board.  Place a large blob of filling in the center of a flour skin (3-4 table spoons), leaving 1/2" open along the edge of the skin.  
  2. Fold the flour skin gently in half and press the edges tightly together between your thumb and forefinger, until the pocket is tightly sealed.  
IV. Cooking the Chive Pockets
  1. (Medium Heat) Heat 1/2 Tbsp of vegetable oil in a 10-12" frying pan.  Place 2 pockets in the pan, and let cook for 2 minutes. 
  2. Add half a cup of cold water in the frying pan, cover the pan and turn the heat to low-to-medium.  Cook until the water is all vaporized (about 5-7 minutes).  Note- Don't let the pockets cook for too long, because all the ingredients in the filling are cooked already.  
  3. Open the pan cover, check the bottom side of the pockets.  If the bottom is not golden brown, turn the heat to medium and let cook for a couple of minutes more, until the bottom is golden brown.  
  4. Flip both pockets over and cook for another 2-3 minutes until both sides are golden brown.  Take them out and serve.  Note- The chive pockets can be served with some soy sauce and sesame oil.  Papa likes to add some rice vinegar.  I sometimes add some chili sauce.  It goes well with a bowl of Hot and Sour soup.

Thursday, September 1, 2016

Shrimp Fried Rice (蝦仁蛋炒飯)

A Facebook friend asked about this dish, We suggested an online recipe as a start, until we got a chance to try our hands on it.  Albeit a simple dish, the fried rice should be dry (not soggy), and the shrimps taste fresh.  As it turns out, the recipe below is the combination of two previous posts, Cantonese Yang Zhou Fried Rice (揚州炒飯) and Sautéd Crystal Shrimp (水晶蝦仁).
  1. Cook your rice with slightly less water.  Or, store your cooked rice in the fridge overnight. Either way your rice will be a bit too dry to consume in any regular fashion, perfect for making fried rice. Set aside 4 cups.
  2. Defrost a pound of frozen shrimp (shelled and deveined, medium size, available from almost any market).  Marinate for 2-3 hours with 1 Tbsp of rice cooking wine, 1 Tbsp of corn starch, 1/4 tsp of baking soda, and 1 Tbsp of veggie oil.  Note- Baking soda helps preserve the liquid inside the shrimps, and make the shrimp meat taste slightly crunchy.  Might consider use half of the shrimps here. And half for Sautéd Crystal Shrimp. 
  3. Beat 3 eggs and add 1/4 tsp of salt into the egg fluid.
  4. Mince 2-3 chunks of scallions.  
  5. [Pre-cook shrimps] Add 2-3 Tbsp of vegetable oil into a flat bottom cooking pan.  Turn on high heat for a minute.  Pour in the marinated shrimps and stir till the shrimps are almost cooked, i.e., turning pale pink (but not bright pink), about 1-2 minutes.  Take out and set aside.
  6. [Pre-cook scrambled eggs] Add 2-3 Tbsp of vegetable oil into the flat bottom cooking pan.  Turn on medium-to-low heat for a minute.  Pour in the egg fluid.  Turn the pan and let the egg fluid spread across the bottom of the pan as much as possible.  Let cook for 15 seconds.  Turn on high heat.  Stir and scramble the egg for a minute.  Take out and set aside.
  7. [Fry the rice] Add 2-3 Tbsp of vegetable oil into a flat bottom cooking pan.  Turn on high heat for a minute.  Pour in half of the minced scallions prepared in Step 4.  Stir till fragrant.  Pour in the rice prepared in Step 1.  Stir and mix for 2-3 minutes.  Pour in the scrambled eggs.  Stir for another 2-3 minutes.  Now season to taste with salt and pepper (add 1/4 tsp of salt a time, and a pinch of black pepper, i.e., 1/8 tsp, a time).  At this point, the fried rice is ready. Note- No need to add any water, or soy sauce.  Keep the rice Dry!
  8. Now, pour in the shrimps prepared in Step 5 (still cooking under high heat).  Stir and mix for another 1-2 minutes. Turn off heat. Add the other half of the minced scallions, stir and mix.  Here is a picture of the finished product.  Note- The rice shown here is half brown rice and half short-grained white rice.

Wednesday, July 27, 2016

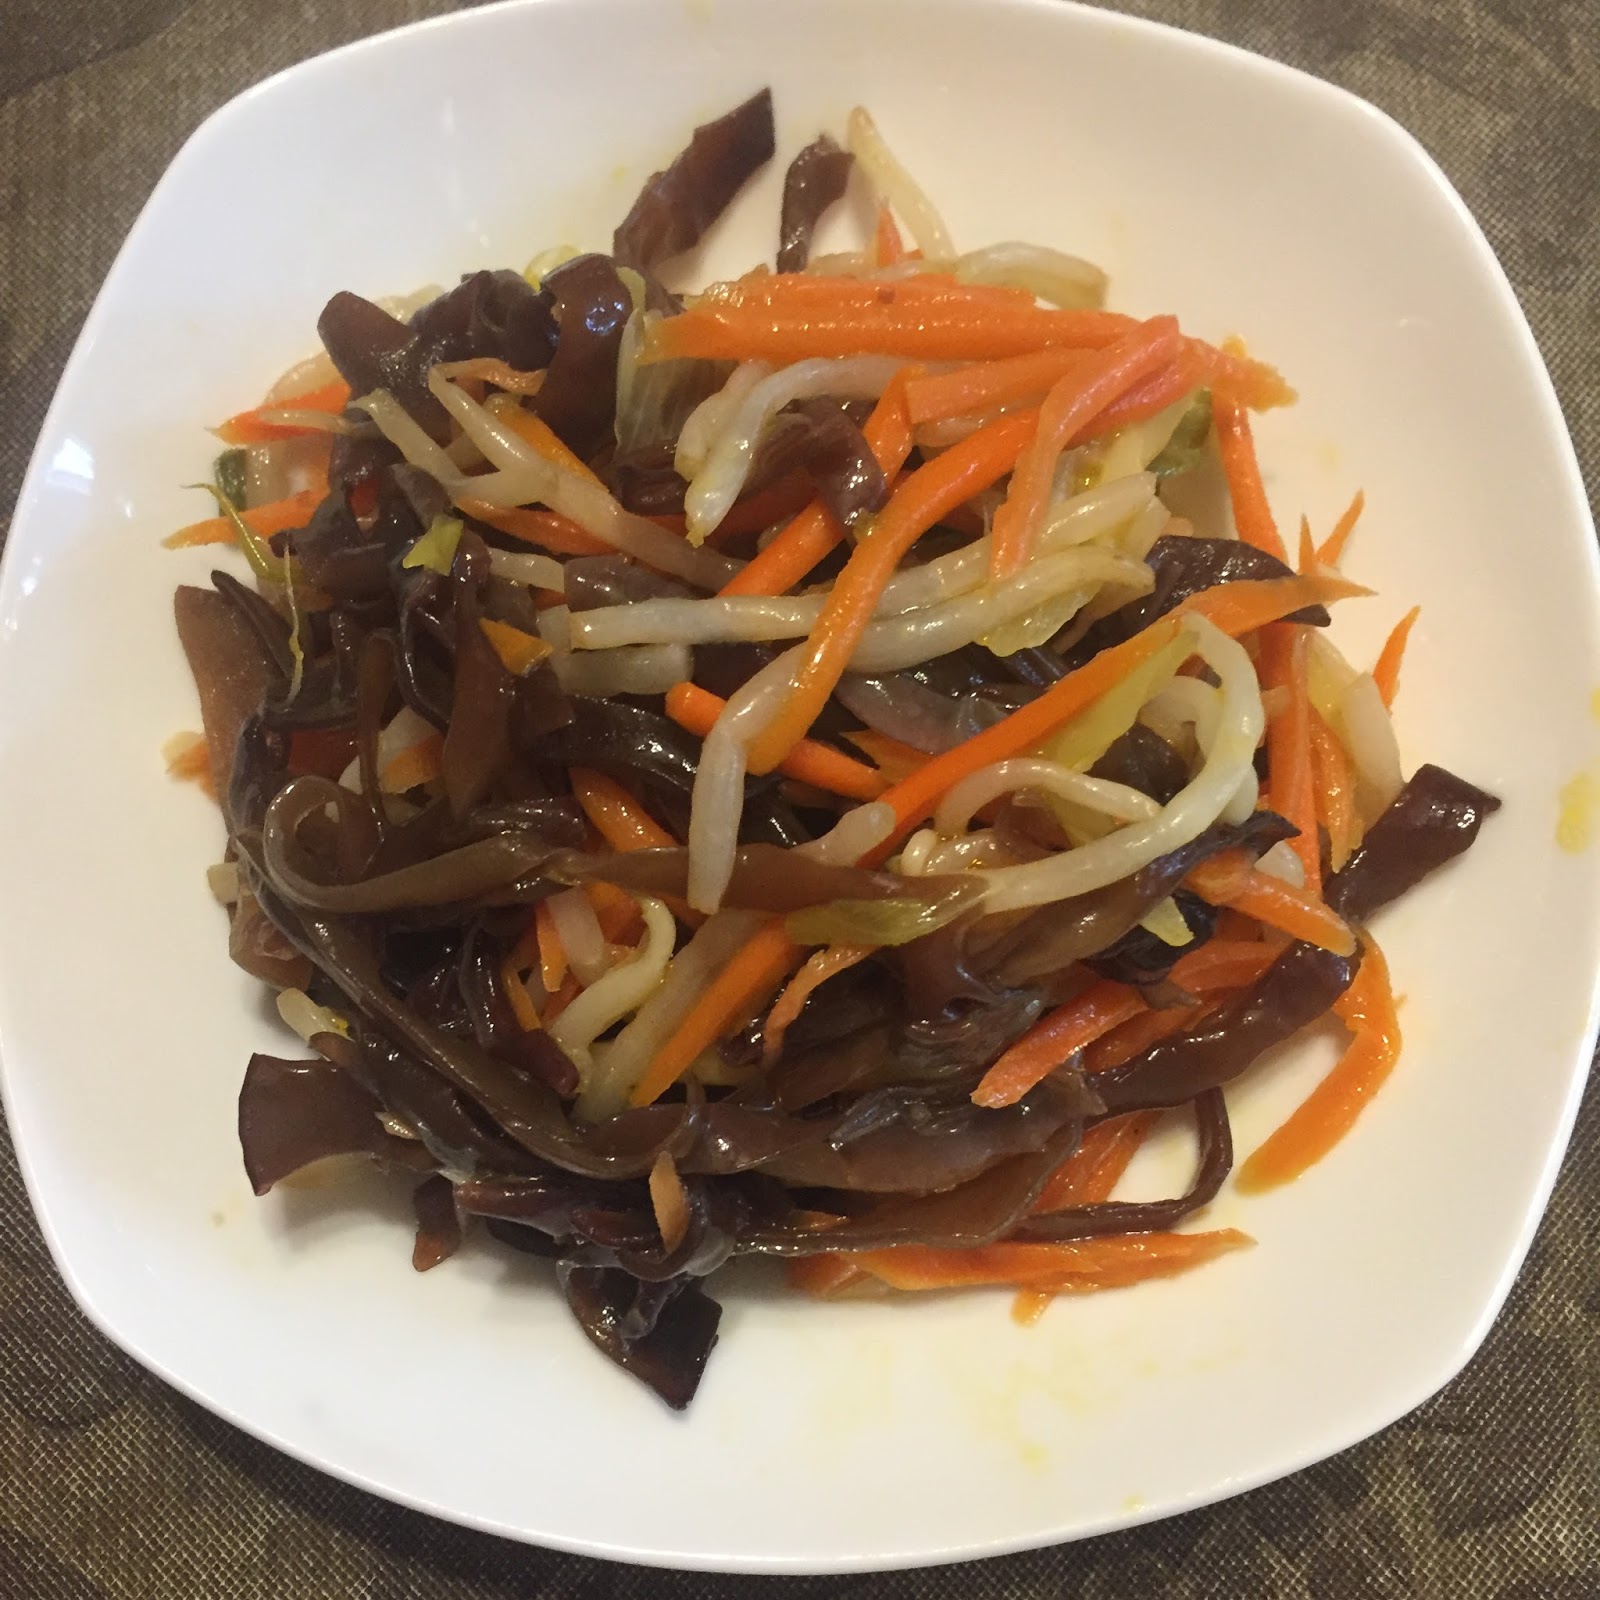
Bean Sprouts with Three Shreds (銀芽三絲)

This is quite a treat, an all-vegetable treat, that's surely enjoyable for meat-lovers and for those who may not have liked veggies that much (no greens in this dish :-). This dish can be chilled and served cold as an appetizer, good on a hot summer day.  BTW, Din Tai Fung's appetizer, Seaweed and Beancurd in Vinegar Dressing, might have been derived from this traditional Shanghai-style appetizer.
  1. [Prepare the Veggies] (1) Rinse ~8oz (half pound) of sprouts, and (optionally) remove both tips from each sprout (綠豆芽, aka 銀芽); (2) Peel 1-2 carrots and and shred with a Julian Slicer (紅蘿蔔絲); (3) Soak 10-12 wood ears in water for 60 minutes, remove harder knots, and cut into thin slices (木耳絲); (4) thinly slice 6-8 chunks of green onions (蔥絲). 
  2. [Sauté the Veggies] Add 2-3 Tbsp of vegetable oil into a flat bottom cooking pan. Turn on medium-to-high heat, add shredded carrots into the pan, stir for a minute. Add sliced wood ears into the pan, stir till the shredded carrots are slightly soft (2-3 minutes). Season with 1/4 tsp of salt, (optionally) 1/2 tsp of light soy sauce (Light-colored soy sauce only!), and 3 tsp of sugar. Add bean sprouts into the pan, and stir for 1-2 minutes. Add 2 tsp of white vinegar around the circumference of the pan (鍋邊醋). Turn off heat. 
  3. Stir and mix the veggies thoroughly.  Season to taste with salt (1/4 tsp a time), sugar (1 tsp a time), and white vinegar (1/2 tsp a time), to your own liking of the sweet-and-sour taste.  At the end, add the sliced green onion into the pan, and stir (please note the late addition of the green onion, to keep it green). Note- Salt, Sugar, and Vinegar is the ingredients for a Shanghai-style Vinegar Dressing
  4. Sprinkle sesame oil liberally on top of the veggies, and mix evenly.  Chill and serve cold as an appetizer. Here is a picture of the finished product. 

Thursday, July 14, 2016

Hainanese Chicken Rice (海南雞飯)

A Facebook friend asked about this dish, the dish that's often referred to as Singapore's National Dish.  After looking at some online recipes and videos, we tried our hands on it, hoping to make it easy to reproduce at home. We used chicken thighs (with skin and bone), instead of a whole chicken, and the essential scallion, ginger, and garlic (蔥、薑、蒜), salt, pepper, and rice cooking wine as seasonings.  The results turned out to be quite satisfactory.  BTW, it might be interesting to compare this dish with the Spanish Rice we posted earlier this year.
  1. [Prepare the chicken] Take about 3 pounds of chicken thighs (with skin and bone), rinse thoroughly, trim off excess fat, and rub a thin layer of salt on both sides evenly.  Let sit for about 30 minutes. Note- We used 2 packs of Costco's 6-pack chicken thighs,
  2. [Cook the chicken] Place the chicken thighs in a medium-sized pot.  Add 4 cups of water, and 3-4 chunks of scallions (chopped into 2-3 inches segments), 6-8 thick larger slices of ginger, 3-4 cloves of garlic (peel and press flat with the side of chef's knife).  Season with 3-4 Tbsp of Rice Cooking Wine and 1/2 tsp of salt.  Turn on high heat, bring to boil, reduce to low heat, cover the lid, and let simmer for 20 minutes. Turn off heat, but leave the lid on for another 10 minutes.  Take out the chicken pieces, rub a thin layer of sesame oil and salt on both sides of the chicken, and let cool.  Filter out the stuff in the chicken soup and set the soup aside. Note- Use the poke-through test to determine if the chicken is fully cooked.  The chicken is fully cooked if a single chopstick can easily poke through the chicken meat and the fluid coming out of the meat is clear (with NO pinkish color).
  3. [Prepare the rice] Rinse 3 cups of long-grained rice and soak the rice in water for 20 minutes.  Drain the water out from the rice thoroughly.  Set aside.  Note- This step can be conducted while the chicken is being marinated in Step 1.
  4. [Prepare the seasoning for the rice] Mince and set aside 10-12 chunks of scallions, 5-6 inches of ginger, and 3-4 cloves of garlic. 
  5. [Cook the rice] Add 2-3 Tbsp of veggie oil (or sesame oil) into a large-sized flat-bottom non-stick cooking pan.  Turn on medium-to-high heat.  Add 1/3 of minced scallions and ginger and all the minced garlic (from Step 4), and (optionally) 2-3 Tbsp of Fried Shallots (油蔥酥), into the pan.  Stir and cook till fragrant.  Add the rice prepared in Step 3 into the pot.  Stir constantly for 5-6 minutes.  Then pour 3 cups of chicken soup prepared in Step 2. Stir evenly, cover the lid, bring to boil, reduce to low heat, and let simmer for 5-6 minutes (with the lid on).  Stir the rice, and turn on medium-to-high heat.  Continue to stir until the chicken soup is fully absorbed into the rice (another 3-4 minutes).  Note- Use 3 cups of chicken soup for 3 cups of rice, i.e., equal number of cups for the soup and the rice. No need to add salt into the rice. 
  6. [Prepare the dipping sauce for the chicken] Mix the remainder of the seasoning prepared in Step 4, i.e., 2/3 of the minced scallions and ginger, in a small bowl.  Add small amount of veggie oil (or sesame oil) into the mix to soak the seasoning.  Add 1/2 tsp of salt and 1/4 tsp of white pepper into the seasoning mix and stir evenly.  
  7. [Serve the dish] Remove the bone from each chicken thigh, and cut the thigh into slices.  Place the slices on a plate.  Slice and place half a Persian Cucumber and half a tomato on the same plate.  Fill a small bowl with the cooked rice, and place the rice into the plate by carefully and slowly flipping the bowl onto the plate.  Serve the plate along with the dipping sauce (for dipping, or sprinkling on top of, the chicken slices).  Here is a picture of the finished dish.

Saturday, May 14, 2016

Stewed Bean Curd Chunks (王媽媽滷豆乾)

This is a recipe I learned from a dear friend of mine, who learned to make this extraordinary dish/snack from her mom.   The recipe calls for 6 pounds of bean curd chunks at a time.  For my first try, I reduced the volume to 4 pounds.   But they tasted so good, and they were all gone in one week when I shared them with friends.   Since then,  I have made 6-pound runs for three times, a total of 22 pounds of bean curd chunks so far.

The cooking method is very simple, with the right bean curds and a bit  patience.


Ingredients:

1. 6 lb bean curds (the factory of Furama Tofu 福臨門 is located in our neighboring city Druate.  They have a retail store and we can buy the side strips of the baked bean curds 五香豆干邊條 in 2 pound bags. (see picture on the left) If you buy a package of 4 piece bean curds in the supermarket, it is about 12 oz per bag and you will need 8 packages.  You can certainly reduce the quantity accordingly.)
2. 1 cup soy sauce
3. 2/3 cup vegetable oil
4. 3/4 cup rock sugar (冰糖)
5. 3/4 cup rice wine
6. 3 star anise (八角)
7. 3 dried hot peppers
(Note, original recipe requires 1 cup of ingredient #2 to #5, I reduced #3 to #5 to less than one cup because it is a bit too sweet to me and there is always excess oil left after it is done)

Steps:

1. cut the bean curds into half inch cubes. (see left)
2. put #2 to #7 into a big cooking pan (12-inch in diameter, 3-inch deep), bring to boil.
3. Add bean curds, mix with the sauce well and bring to boil again.   Cook with the lid closed for 20 minutes in medium to low heat.  Stir and mix thoroughly once after 10 minutes of cooking.
4. Turn off the heat, keep the lid closed and let it cool for 20 minutes.  
5. Turn the heat on again in medium to low heat, mix the bean curds with the sauce and cook for 5 minutes after it is brought to boil.  Turn the heat off, let it cool for 20 minutes.  Repeat the process for 4 times.  Monitor the liquid in the pot, make sure it doesn't dry out and burn the food.  If the liquid is drying out, turn the heat lower.
6.  The reason for the step 4 is to allow the bean curds to be fully soakedwith the sauce.  For the last time, you can cook it with open lid and turn the heat up until the liquid is dried.

If there is any liquid left in the pan, it should be mostly oil.  Drain the oil and let the bean curd chunks cool.  Then you can put them in the container and keep it in the refrigerator for months.  It is great as snack food or appetizer -- full of flavor and protein, no Carb, no fat, very healthy!